Navigation: Basic Working Procedures > Work Orders > Display Work Order Details Screen > Items Tab >
Items Tab - Parts


|
Navigation: Basic Working Procedures > Work Orders > Display Work Order Details Screen > Items Tab > Items Tab - Parts |
|
The Parts panel appears on the right side of the Items Tab when you select the New Part button or click a Parts detail line on the left. (See Items Tab Navigation, if needed.) (Also, see Basic Pricing.)
Note: Ability to modify Parts entered by other users is controlled through Employee Security Rights.
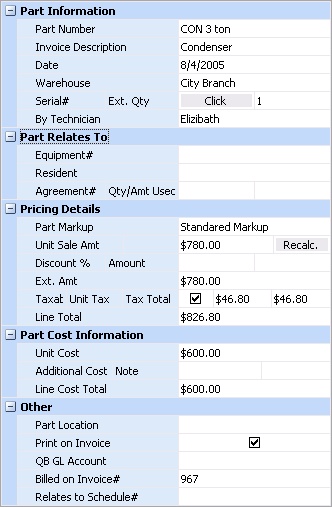
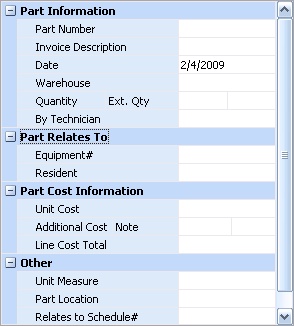
Below you see the Parts panel from a Service Call Labor screen on the left, and from a Project on the right. Either one appears on the right side of the Items Tab when you select the New Part button or click on an existing Parts detail line in the left panel.
The illustration below comes from the actual Work Order Items Tab. (Note that a Project has Pricing Details only on the Estimate Items Sub-Tab.)
Service Call |
Project |
|
|
Because the Service Call Invoice comes from actual Time and Material, the Parts panel on the Items Tab has an additional section, Pricing Details. Projects cover these Labor fields on the Estimate Items Sub-Tab, supplying billing information for the Invoice. All fields for both types of Work Orders are discussed here.
| • | To add a single Part, click the New Part button. Then move to the Parts panel on the right to edit the details. |
| • | To enter multiple parts, click the down-arrow next to the New Part button. The Select Multiple Parts screen will appear. Use the checkbox to select as many parts as you need. When you return to the Transactions panel, click to adjust each Part in turn, using this Parts panel. |
| • | To Use the Bar Code Scanner, click the down-arrow next to the New Part button. and select Scan Parts. |
Fields: (For help with data entry, see Field Select Boxes and Field Helpers.)
Tip: Working with the entry panel, enter all fields in the order in which they appear on the screen. If you skip a Required Field and get an error message, hit the Escape key to go back to enter the missing field.
Part Number:
The Part Number. You can search by the Part Description, Category, etc. (See Popup Lookup Combo Box, used for large Parts lists. To add an entry, click the Ellipsis button ( ) and select New.)
If the item is a Parts Kit and the Generate Details on Sales flag is selected, see the Inventory Impact for Parts Kits. Also, see Parts Kit Pricing for examples of how different Kit Pricing Methods affect the Work Order Item display.
Invoice Description:
The default is the Part Description. You can change the description for what should print on the Estimate (Projects) or the Invoice (Service Calls).
Date:
Reflects the date this Part was added to the Items Tab. You can change this. (See Calendar Helper.)
Warehouse:
Reflects the Warehouse, if any, where this Part was in Stock.
Serial Number (if applicable):
Enter the Serial Number, if any, for the installed Part. (See Serial Number Helper.)
Quantity/extended quantity:
The Quantity of this Part. The Extended Quantity will calculate automatically and is protected.
PO Receipt:
Protected. This field appears if the Part was received on a PO Receipt. You can click on the Ellipsis (...) to review the actual PO Receipt.
By Technician:
If the Part was attached to the Work Order through a PO Receipt, then the name of the Employee who received it defaults here. You can manually select the Technician who used this Part.
Part relates to:
Equipment:
The Customer Equipment where this Part will be used. (See Lookup Combo Box. To add an entry, click the Ellipsis button ( ) and select New.)
Job stage:
(For Project Estimates only.) The Job Stage where this Part will be used. (See Simple Lookup Box.)
Resident:
The Resident Unit at the Job Site where the Part will be installed. (See Lookup Combo Box. To add an entry, click the Ellipsis button ( ) and select New.)
Agreement and Qty Used:
(For Service Calls only.) The Agreement associated with this Service Call. (See Search and Open Lookup Box to review the Agreement.)
The Quantity Used field is protected and indicates how much of the Agreement Discount Coverage is being used by this detail line here. If and when the Quantity meets the Discount Limit, this field shows how much of the entire detail Quantity was applied toward the Agreement. See the Agreement Discount Coverage Example.)
(Pricing details are used for Invoices, so for Service Calls, you work with them here on the Items Tab and for Projects, you work with them on the Estimate Items Sub-Tab.)
The Parts Markup used in pricing and billing. The default comes from the Parts Markup selected in the Work Order, General Tab. However you can change this. See Basic Pricing. (See Lookup Combo Box. To add an entry, click the Ellipsis button ( ) and select New.)
Unit sale/ Recalculate:
The Unit Sale amount calculations are based on the Parts Markup above. (See Basic Pricing.)
However, you can enter a manually keyed override. This is the final override in the pricing hierarchy for a detail line. Access to make this override is granted in Employee Security Rights.
The Recalculate button will refresh the screen for any changes, after a confirmation message.
Discount Percent or Amount:
These fields are automatically filled from the Agreements Coverage Tab, if applicable.
Otherwise, for Work Orders not associated to Agreements, you may enter a discount for this Part. Click on either Percent or Amount. (See Calculator Helper.)
Note: If this is a Service Call for an Agreement that has Discounts set on the Coverage Tab, the terms of the Agreement apply and override any manual entries.
Extended amount:
Protected. The Extended amount is the total sale amount. This equals the Unit Sale amount multiplied by the Quantity, with Agreement Discounts, if any, applied.
Taxable:
When you click the check-box, displays the tax amount for the Part (if any), which is determined based on the Work Order's Sales Tax selection. To change the Part's tax rate, you will need to select a different Sales Tax in the Work Order, General Tab.
Line total:
The total sale amount for the Part including Sales Tax.
Part cost information:
Unit Cost:
The Part Cost without Markup. This is the amount that you pay for the Part. (See Part, General Tab and Inventory Valuation and also Receive Purchase Orders for Parts costing.) You can change this. (See Calculator Helper.)
You can enter manually any extra costs not normally included in Parts Cost updating, such as custom refinishing or temporary storage for a Part. This amount is added to the Unit Cost for the Line Cost Total below. Recommended - add a short Note identifying or explaining this Additional Cost.
Note: You can even create a stand-alone detail line naming a Part with no Quantity or Unit Cost and just enter the Additional Cost and Note, describing some situation.
Line cost total:
Protected. The total cost price is the Unit Cost multiplied times the Quantity.
Other:
The Unit of Measure typically associated with this Part (for example a case, each, roll, etc.), showing the default. See Units of Measure. (See Lookup Combo Box. To add an entry, click the Ellipsis button ( ) and select New.)
Example: If the Part has been defined with a Unit of Measure of "Each" and you enter a different Unit of Measure, such as "Box of 10," then when you get to bottom of the Parts panel all extended quantities and amounts will be recalculated, in this case, by a multiple of 10. You will find it convenient to set up and use appropriate Units of Measure.
Part Location:
The Location on this Job Site where the Part is to be used (not the Warehouse it is taken from). See Part Locations. (See Lookup Combo Box. To add an entry, click the Ellipsis button ( ) and select New.)
(Estimate for Projects, Invoice for Service Calls.) Leave the check in the box to let this detail line for the Part print for the Customer to see. To prevent this Part detail from printing on the Estimate by including it in a Line Group, you must uncheck this box.
QB GL Account:
(If any. This field may not appear.) Contains the default Company GL Income Account for exporting to QuickBooks Invoices that have this Part on an Item sales line. Defaults from the Part General Tab, but you can change it. This information is necessary when transferring data to Quickbooks. (See Lookup Combo Box. To add an entry, click the Ellipsis button ( ) and select New.)
Qty Processed:
(For Estimate only.) Protected. The quantity of this Part already moved from the Estimate to the Items Tab using Process Parts.
Billed on Invoice:
(For Service Calls only.) Protected. The Invoice associated with this Service Call. (See Search and Open Lookup Box to review the Invoice.)
Relates to Schedule #:
Protected. (If any. This field may not appear.) The Schedule Slot, where this Part was added to the Work Order.
Page url: http://www.fieldone.com/startech/help/index.html?_work_order_screen_itemstab_parts_.htm