Navigation: Lists and Tables > Work Order Setup >
Parts Markups


|
Navigation: Lists and Tables > Work Order Setup > Parts Markups |
|
Parts Markups are key entries for Billing and Profit and Loss calculations. They control how Parts are charged to the Customer.
By setting up and using Parts Markups carefully you can do your billing without tedious manual calculations. The person entering Parts as Item details on Work Order transactions specifies the Part selected and the rest is automatic.
You can enter Parts Markups in the following places to influence the logic of defaults and overrides in Pricing calculations. (To understand better how and where Parts Markups are used, see Pricing.)
| • | Controlling the entire Work Order: |
| ► | Company Preferences, Work Order - determines Work Order Type |
| ► | Work Order Type - contains Parts Markup and Labor Rate |
| ► | individual Work Order General Tab - contains Parts Markup and Labor Rate |
| ► | individual Agreement Pricing Tab - contains Parts Markup and Labor Rate |
| • | Controlling the Work Order Item Detail Lines: |
| ► | General Tab - optional Parts Markup override for a certain Part |
| ► | Customer Special Pricing Tab - Parts - optional Parts Markup overrides |
| ► | actual keyed entry on Item Detail for Parts |
| • | On the Work Menu at the top of the screen, click the Work Order down-arrow, and select Parts Markups. |
| • | The smaller-size Lookup screen will appear. (To add or change a record, see Small Lookup, Add or Edit.) |
| • | Next, the Markup Table Details screen will appear. This screen has a second Tab for Notes. |
This screen, with multiple details, is a DataView, where you can adjust the layout, print or export the data (see DataView Menu). There may also be a header panel above for the "parent" of the details, or a DataView Footer below. By using the Field Chooser function you may be able to add more fields to the display from the Customization Screen.
Screen header fields:
Markup Name:
Required. The abbreviated name of the Markup. Choose short names which are clear and recognizable for easy and accurate selection on work screens in the Parts Markup Lookup Combo Box.
(Suggestion: Use some indication of Cost or Sale Basis in the name, such as "Cost-Plus 30" or "Sales-Discount 15," unless your Company already has a clearly defined set of Markup values.)
Markup Type: Sale or Cost
TIP: It is inadvisable to change Markup Type once created and put into use. This Parts Markup may already be entered into various Pricing Controls described in the introduction to this topic.
The money amount Basis for the markup (see explanation of Basis below).
Explanation of Cost and Sale Cost Basis:
Cost Basis:
There are two possible sources of the Cost for Parts used in the Markup calculation:
| • | Parts taken from Inventory Stock - Cost selected according to the Inventory Valuation method currently indicated for each Part on the Part General Tab |
| • | Parts purchased directly for a Work Order - the actual Cost, or price paid to the Vendor on the Purchase Order |
Sale Basis:
This selection for the Markup calculation requires you to have a Sales Price on the Part General Tab. This Sales Price is then multiplied times the Markup Percent.
The most typical use of the Sales Basis is to give Discounts to certain Customers or for certain types of work. However, it might be that for a certain group of Customers or a certain types of work you wish to charge more than the normal Sales Price. (See Markup Percent below for how to use a discount or surcharge.)
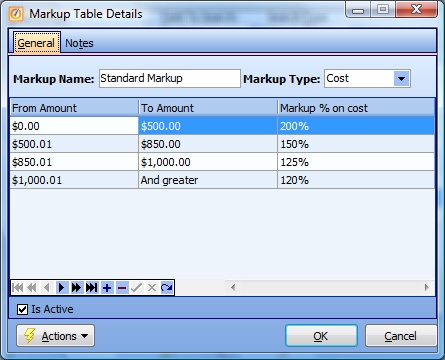
Here you can enter multiple Pricing Ranges, if the Parts Markup is based on Price Breaks. If Price Ranges are not involved, you enter the first and only Markup Percent.
For example, perhaps your Company would like to give a discount for dollar amount purchased.
| 1. | Thus for amounts from $0.00 to $500.00 you have a 200% Markup, doubling the Cost. |
| 2. | However, from $500.01 dollars up through $850.00 dollars, your Markup will only be 150%, adding only half the Cost |
| 3. | You can go on for larger purchases. You can identify all these Price Ranges for this one Markup. |
On the other hand, perhaps for this Markup type you will always use the same percent, no matter the dollar amount of the purchase. Then you have only one entry on the screen. Use the defaults "From $0.00" up through "And greater" and only enter the Markup %.
From Amount:
Protected field. Defaults to $0.00. Displays the Start point for a Range.
To Amount:
Defaults to "And Greater." Displays the End point for a Range. (If using Ranges, then the next From Amount should be this To Amount plus one cent.)
Markup % (on Cost or on Sale Basis):
For examples of Margin Percent variations, see Parts Discounts in Special Purpose Pricing.
| • | Use zero % to obtain a No-Charge Price (any Basis multiplied by zero = zero). |
| • | Use less than 100% (e.g., 90 %), for a less common method of Margin Discount. |
| • | Use 100% to indicate No Markup, but rather the same amount as the Basis. |
| • | Use more than 100% (e.g. 115%) to indicate a Margin Markup, (positive surcharge) above Cost or Sales Basis. The common approach is to create a "Normal" Margin and a lower "Discount Margin." |
| • |
FIX Agreement Type Refs
Note: Take steps to set up Parts Markups specifically for your Agreement Types. For instance, you probably need a "No Charge" type of Markup, and possibly others.
Is Active:
Use the checkbox to indicate currently used by your Company. If you later remove the check-mark making this field Inactive, this entry will still show on older records where it has already been used, but will not be available for use in the future.
The default for the Lookup screen is to show Only Active records. You can remove the check-mark from the select-box on that screen and view all.
When complete:
Click OK to save your entries and exit the screen.
Page url: http://www.fieldone.com/startech/help/index.html?_tables_work_order_parts_markups_.htm