Navigation: Basic Working Procedures > Work Orders > Display Work Order Details Screen > Items Tab >
Items Tab Navigation


|
Navigation: Basic Working Procedures > Work Orders > Display Work Order Details Screen > Items Tab > Items Tab Navigation |
|
Items Tab Navigation is very flexible and is designed in many ways to serve as a tool for repeated use by various persons.
You can tailor panel size and appearance using Hide and Show arrows and Open-Shut Icons (+) and DataView Functions. Here is a description of the panels on this screen and their functions.
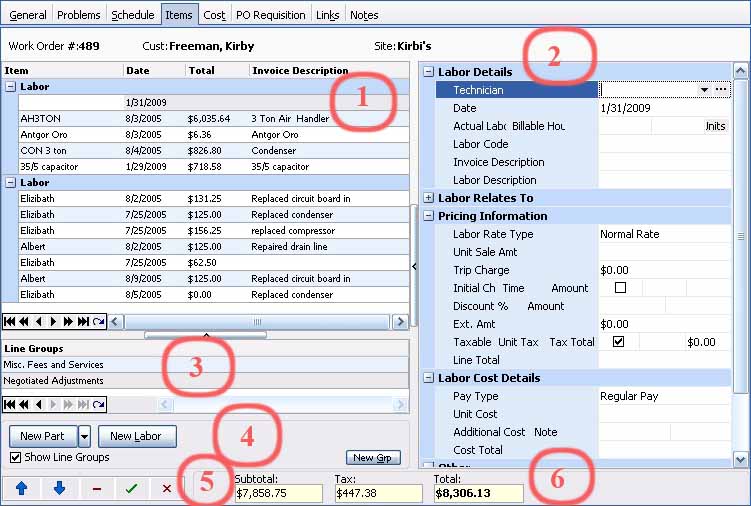
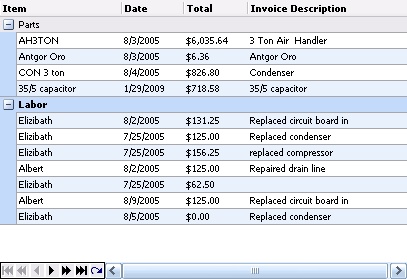
1. Left panel - transactions already entered :
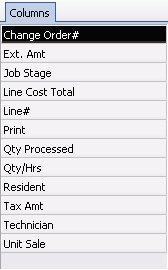
The left panel is used to view the items. Only some fields appear, to simplify the view. If you would like to add more columns, you can select them using Field Chooser:
This screen, with multiple details, is a DataView, where you can adjust the layout, print or export the data (see DataView Menu). There may also be a header panel above for the "parent" of the details, or a DataView Footer below.
This Detail Display screen allows you to maintain details, but not right here on the display. It uses the New and Edit buttons below (or the Actions button) to open a more complete entry screen for each item. You can use the Paging Icons at the bottom to view all records.
2, Right panel - add or change a Part or Labor detail:
The right panel is used to enter and edit the items. Please refer to Items Tab - Parts and Items Tab - Labor, as the models for the right-hand panel on all Items Tab entry screens.
Tip: Working with the entry panel, enter all fields in the order in which they appear on the screen. If you skip a Required Field and get an error message, hit the Escape key to go back to enter the missing field.
3. Line Groups entry panel (optional):
(Line Groups are used for Invoices, so for Service Calls, use them here on the Items Tab and for Projects, use them on the Estimate Items Sub-Tab.)

See the topic on how to use the extra Panel for Line Groups.
4. Selections below left panels:

New Part button:
| 1. | New Part - opens the Part Entry edit panel on the right for a single Part |
| 2. | New Part, down-arrow: |
| ► | Insert Multiple Parts - opens the screen Select Multiple Parts, where you select the checkbox for as many Parts as you need. When you return to this panel, click to select and adjust details for each Part, using the editing window at the right. |
| ► | Scan Parts - allows you to use the Bar Code Scanner to enter many Parts quickly. |
New Labor button:
Opens the Labor Entry edit panel on the right where you select the Technician and fill in other details
Show Line Groups Checkbox:
(Line Groups are used for Invoices, so for Service Calls, use them here on the Items Tab and for Projects, use them on the Estimate Items Sub-Tab.)
A check-mark here opens an extra panel for Line Groups, just below the Transactions panel.
5. Icons to add and change details in Transactions panel:
This screen uses two types of transaction icons:
![]()
| • | Data Entry Icons - to control adding, removing, clearing details lines that you enter |
| • | Arrows - for moving detail lines up and down in the Transactions panel |
| ► | When you Print an Estimate or Create an Invoice that shows detail lines, these are sorted by type as set in Company Preferences on the Work Order Tab: |
| ▪ | Parts |
| ▪ | Labor |
| ▪ | Line Groups |
| ► | Within each group, the detail lines are sorted as they appear here on the Work Order Items Tab, where you can use the Up-Down Arrow icons to sort them manually. |
| ► | (After you create the Invoice, but before you Print the Invoice, you can still sort the Invoice Detail Lines, again using the Up-Down Arrow icons for that screen.) |
6. Running Totals for Transactions already entered:
Item Totals are used for Invoices.
| • | For Service Calls, they show here on the Items Tab and also for Schedule Slots, where Parts are added. |
| • | For Projects, they appear on the Estimate Items Sub-Tab only. |
| • | Totals do not show on Items Tabs used for Posting. |
![]()
Page url: http://www.fieldone.com/startech/help/index.html?_work_order_screen_itemstab_navigation_.htm