Navigation: Basic Working Procedures > Employees > Display the Employee Screen >
Security Tab


|
Navigation: Basic Working Procedures > Employees > Display the Employee Screen > Security Tab |
|
On the Security Tab you set this Employee up to log on and use FieldOne. In addition you grants rights to this Employee to perform specific actions.
This screen, with multiple details, is a DataView, where you can adjust the layout, print or export the data (see DataView Menu). There may also be a header panel above for the "parent" of the details, or a DataView Footer below. By using the Field Chooser function you may be able to add more fields to the display from the Customization Screen.
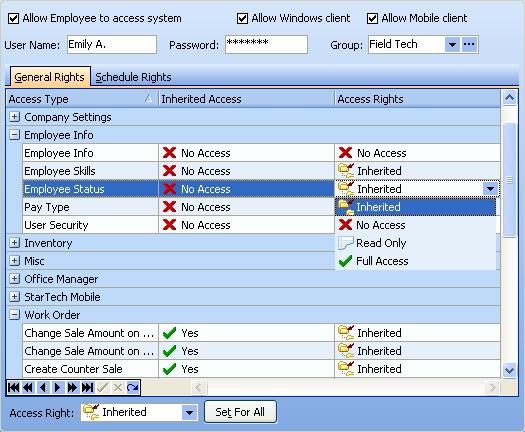
The Header captures some general information about this Employee's access to the system.
The Bottom Tabs of this screen, with the General Rights and Schedule Rights Tabs, is very specific for the purpose of granting security. To understand how this screen is designed and used, please refer to User Groups, which has a similar layout and more detailed explanation.
This Employee Security Tab uses Inherited rights, so if a change is made to the "parent" User Group Access Rights, this change will immediately be reflected for any Employee belonging to that User Group.
The Access Right field along with the Set for All button at the bottom right allows you to make an overall change to all rights for this Employee. (See Set for All below.)
Allow Employee to access system:
Checkbox gives access to the currently used Company file. This offers a quick way to disable an Employee's access completely.
Allow Windows Client:
Checkbox gives access to the Windows desktop version of FieldOne.
Allow Mobile Client:
Checkbox gives access to this Company via FieldOne Mobile. (See www.fieldone.com/mobile/ )
Required. Specify a User ID for this employee. The Employee uses this to log on to the system and it also appears with a timestamp for any changes on every Record Log.
Note: The User Name must be unique throughout the system. This is a required field.
Password:
Required. Specify a strong password that is hard to guess. (You may use upper and lower case, numbers and special characters. The only restriction is that this field is required.)
Please note: Your Employee will need to know this password when logging on to FieldOne. Make sure that the Employee stores this in a well-guarded fashion.
Later you can always change the password. It is a good idea to do this periodically to help keep passwords secure.
Required. Select a User Group for granting Inherited Rights, such as Administrators, Field Techs, etc. In a nutshell: whatever authorizations have been granted to this User Group will be "Inherited Rights" for any Employee selected for this Group. User Groups save a lot of time, because you only have to make exceptions on this screen, by changing or removing Access Rights for this Employee.
(See Lookup Combo Box. To add an entry, click the Ellipsis button ( ) and select New.)
General Rights Tab:
This Tab contains a DataView list that displays all functions in FieldOne, grouped by application module, such as Accounts Receivable, Accounting, Company Settings, Employee Info, and so on.
| 1. | Click on the Open-Shut Icon (+) to open the module for specific functions. The display will default to show any Inherited rights in the Access Rights column. |
| 2. | Click the down-arrow on Inherited rights for the Simple Lookup box of selections. You can change Access Rights for an individual entry: |
| 3. | For any remaining Inherited rights, if a change is made to the "parent" User Group Access Rights, this change will be reflected in the Access Rights for all Employees in that User Group. |
Schedule Rights Tab:
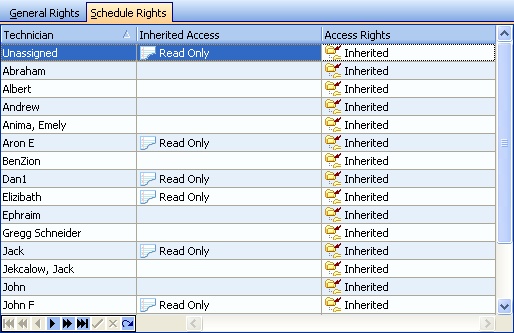
On this Tab you specify whether this Employee is allowed to view and/or modify Schedules for another Employee within the Company. Everything said on the General Rights Tab above also applies here.
(In order to be able to view your own schedule, you must have security rights already granted on the General Rights Tab under the Work Order group for Schedule Board, Self-Schedules.)

This button allows a general override value for all Access Rights, regardless of inherited User Group rights. (The usual route for making many changes to a given Employee would be to create or use a different User Group, as described above.)
For example, you can change all rights from the default Inherited, to No Access, just by selecting the access level and then clicking on the button Set for All.
This button could be useful if for some reason an Employee's Access Rights suddenly need to be restricted or enlarged across the board. You can do this instantaneously with a single command and come back later to enter any exceptions or to simply change the User Group.
Page url: http://www.fieldone.com/startech/help/index.html?_employee_screen_security_tab_.htm