Navigation: Basic Working Procedures > Inventory Management > Parts > Display Parts Details Screen >
General Tab


|
Navigation: Basic Working Procedures > Inventory Management > Parts > Display Parts Details Screen > General Tab |
|
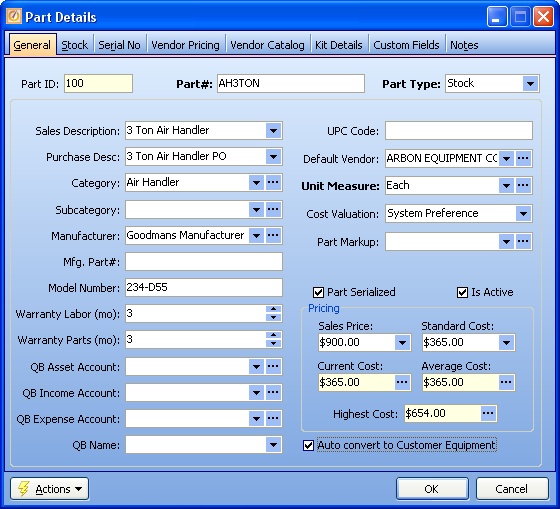
Use the General Tab to fill in the fields which identify and describe this Part and control how it is used in some calculations.
Fields: (For help with data entry, see Field Select Boxes and Field Helpers.)
Protected. Generated when the new Part is created. Provides the unique identification for the Part so that, if necessary, you can change the Part # field below. (See Company Preferences, Starting Numbers Tab, if you wish to control the ID Number. See also, QB Name, below.)
Part #:
The unique identification for this Part to be used in every area of FieldOne. You may enter any combination of numbers and/or letters. You can even enter a description, although there are fields for this below.
| • | It is a very important to give proper Part Numbers. |
| • | Remember that it might be difficult to find Parts when there are huge lists to search and choose from, if the naming is not properly defined. (Remember also, that the DataView screens used to display Parts lists will allow search in any column field displayed.) |
| • | There are many methodologies for numbering and naming conventions for Parts. Most likely your Company has already chosen one and it's just a matter of determining how to use the related Description fields on this screen. |
| • | Your Company may have an internal numbering logic which overrides a Manufacturer's given Part Number, in which case you can use Mfg. Part # below to collect this. |
Selection from the predefined Simple Lookup Box.
| • | Stock - will track this Part for Inventory. (The Stock Tab showing Warehouses is added to this Part) |
| • | Non-Stock - will not track Inventory. (This includes Parts for which you do not wish to track the inventory level and also items that you may wish to charge Customers for that are not necessarily a "Part," possibly certain fees that appear on Invoices.) |
The description that shows for the Customer on an Estimate or Invoice (provides the default there which you can change then).
Purchase Description:
The description that shows for the Vendor when you purchase this Part
Note: If you specify the Vendor Item Number on the Parts Vendor Pricing Tab, then that will become the default Purchase Description
Category:
Allows you to categorize Parts so that you can search more easily. For instance: you could specify Piping, Sinks, etc. See Part Categories. (See Lookup Combo Box. To add an entry, click the Ellipsis button ( ) and select New.)
Prints on Footer
Sub Category:
This field allows you to further organize your Parts into subordinate groups. For instance, for the Piping Category, you might make a Sub Category called Copper. See Part Subcategories. (See Lookup Combo Box. To add an entry, click the Ellipsis button ( ) and select New.)
The Company that produced the Part (not the Vendor who supplied it.) See Manufacturers. (See Lookup Combo Box. To add an entry, click the Ellipsis button ( ) and select New.)
Mfg. Part #:
The Manufacturer's part number.
| • | Sometimes required when ordering replacement parts. |
| • | You will also find this field very helpful if you use Import Vendor Catalog, because it offers the proper link to store prices from various Vendors (who may use different numbers of their own for this Part). |
Model Number:
The number which identifies the version of this Part as described by the Manufacturer. Useful for warranty work.
Warranty Labor (mo):
The warranty for related Labor, if any, expressed in terms of months.
Warranty Parts (mo):
The warranty for related Parts, if any, expressed in terms of months.
Contains the default Asset Account from the Company Preferences Accounting Tab for exporting to QuickBooks Invoices that have this Part on an Item sales line.
(See Lookup Combo Box. To add an entry, click the Ellipsis button ( ) and select New.)
Note: In order for the Company GL Account Number entered here to be used during Invoice export, it must be linked in GL Accounts to a valid QuickBooks account.
Contains the default Income Account from the Company Preferences Accounting Tab for exporting to QuickBooks Invoices that have this Part on an Item sales line.
(See Lookup Combo Box. To add an entry, click the Ellipsis button ( ) and select New.)
Note: In order for the Company GL Account Number entered here to be used during Invoice export, it must be linked in GL Accounts to a valid QuickBooks account.
Contains the default Expense Account from the Company Preferences Accounting Tab for exporting to QuickBooks Invoices that have this Part on an Item sales line.
(See Lookup Combo Box. To add an entry, click the Ellipsis button ( ) and select New.)
Note: In order for the Company GL Account Number entered here to be used during Invoice export, it must be linked in GL Accounts to a valid QuickBooks account.
If the Part # field (above) in FieldOne differs from the Part Name in QuickBooks, use this field to link them. Over time there may be reasons to change the Import name, but then you must store the original value here. (For more details refer to Understand QuickBooks Naming Exceptions.)
Note: The QB Name list is only available after running QuickBooks Integration.
The Universal Product Code, the data recorded when you Use the Bar Code Scanner for Parts.
Default Vendor:
The Company which supplies the Part when you purchase it (not the Manufacturer who made the Part). See Vendors and Vendor Types. Entering a Vendor here helps during data entry for Process Parts. When you select Create a PO, this will be the default Vendor.
(See Lookup Combo Box. To add an entry, click the Ellipsis button ( ) and select New.)
Gives the default Unit of Measure for this Part. (See Lookup Combo Box. To add an entry, click the Ellipsis button ( ) and select New.)
The default Inventory Valuation Method for the Cost of a new Part is System Preference. (See the Company Preferences, Part Options Tab.) You can change it. This choice determines how to calculate the Cost used in transferring Inventory to a Work Order and also in Pricing calculations based on a Cost type of Parts Markup. (Selection from the predefined Simple Lookup Box.)
Note: For the Standard Cost Valuation method here, see the Standard Cost field below, since these two fields are used together.
Shows the Parts Markup attached to this specific Part - normally empty. (See Lookup Combo Box. To add an entry, click the Ellipsis button ( ) and select New.)
To remove an existing entry in this field, place the cursor at the last letter of the entry and use the Backspace key to eliminate all characters. When you are done, the field will be empty and you can update the record to have it stay that way.
Note: Usually the Parts Markup is defined elsewhere. To see how an entry here affects pricing and billing, see Basic Pricing and Special Purpose Pricing - Parts. (See also Work Order Types and Customer Special Pricing Tab and Service Agreements for some examples)
Note: Even though an entry is made here, during Pricing calculations other sources of Parts Markup may prevail over this one.
Check-box to select tracking by Serial Numbers. (If checked, the Serial No. Tab is added to the Part.)
Note: Wherever needed, Serialized Parts display a prompt to enter Serial Number, for instance during PO Receiving, and on Work Order Parts entries. The Serial Number tracks how these items enter and exit Inventory.
Is active:
The default for the Lookup screen is to show Only Active records. You can remove the check-mark from the select-box on that screen and view all.
Optional entry for the flat or base amount to use in calculating Price on Customer Invoices for this Part.
Note: This field only takes effect in calculations where the Parts Markup selection has the Markup Type set to Sale. (If the Markup Type of the Parts Markup selection is based on Cost this field will not be referenced, instead the Cost is the Basis for the Price when Processing Parts to a Work Order or Estimate.
Optional entry for combined use with Cost Valuation above selected to Standard Cost Valuation. An entry here is not affected by purchasing calculations, but remains stable.
Note: Choose this in order to have an unchanging "Standard Cost" when billing the Customer based on Cost Markup where you do not wish to reflect real-world price fluctuations. (Then you must maintain this value to keep it current, unlike the other Cost choices below.)
Current Cost: (** see Note below)
Protected field on existing Part. Contains the current actual Cost for this Part - paid for to vendors the last time you purchased
Average Cost: (** see Note below)
Protected field on existing Part. Tracks a calculated average of the amounts you paid Vendors when purchasing this part. Example: One time you paid $1.10. The next time you paid $1.00. Then the Average Cost displays as $1.05.
Highest Cost: (** see Note below)
Protected field on existing Part. Tracks the highest amount have ever paid for this Part to any Vendor. Example: You first paid $1.00 for this part. The next time you paid $1.20 and the next time $1.10. Then Highest Cost displays as $1.20.
** Notes for calculated Cost fields:
All these Costs can be used in billing calculations. (See Control Inventory Valuation for more details.)
These fields are automatically re-calculated every time you purchase this Part from a Vendor. You are allowed to make manual override entries here. However, the next PO Receipt accepted for this Part will update these fields again:
| • | New Part - Make an entry (No Confirmation message) |
| • | Existing Part - Click on the Ellipsis button ( ) and enter a value in this field. You will receive a confirmation message. |
Auto convert to Customer Equipment:
Use this Checkbox to indicate that, when the Part is invoiced on a Work Order as having been installed, it will automatically appear as an item of Customer Equipment listed under that Customer.
On the Customer Equipment item, the information from the Parts General Tab here is transferred to the General Tab and the Work Order this item was billed on is transferred to the Work Orders Tab.
Using the auto-convert sets up all the Equipment information needed from this Part for future service, such as:
Model Number
Serial Number
Date Installed
Warranty Dates for Parts and Labor, already calculated for this installation.
Note: Controls set in your Company Preferences will affect the Auto-convert:
| • | If your company has disabled Customer Equipment in the Features Tab, this Auto-convert field will not appear here. |
| • | If you set up Custom Fields in Company Preferences for Parts, they will be transferred to the Equipment, so there should be identical Custom Fields created for Equipment also. |
Page url: http://www.fieldone.com/startech/help/index.html?_inventmanage_parts_screen_general_tab_.htm