Navigation: Basic Working Procedures > Inventory Management > Parts >
Use Bar Code Scanner for Parts


|
Navigation: Basic Working Procedures > Inventory Management > Parts > Use Bar Code Scanner for Parts |
|
The Bar Code Scanner is provided to save you time when entering Parts. You have the option to use a Bar Code Scanner in these places:
| • | Any Items Tab - Parts Sub-Tab, when you click the New Part down-arrow. Items Tabs are used in the following: |
| ► | Estimate Items Sub-Tab - for Project Estimates |
| ► | Time Slot Details Items Tab - for Items entered directly to Schedule Slots |
| ► | Post Schedule Slots Items Tab - for adding Items while Posting |
| ► | Counter Sales - immediate capture of Parts and Labor for Counter Sales |
At any of these starting points, when you select Scan Parts, the Parts Scan screen appears:
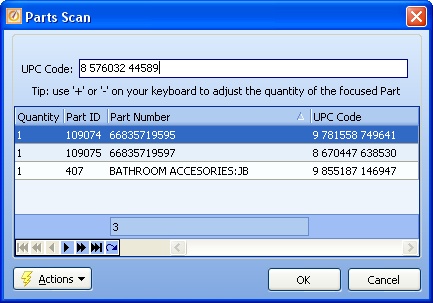
| 1. | Follow the instructions for your scanning device to scan the Bar Code through the scanner, so that the values appear in the UPC Code slot at the top of the screen. |
| • | With a successful scan, the barcode numbers are entered into your computer just as if you had typed them. |
| • | For problem numbers, you can enter the UPC Code manually, by reading the values of the Bar Code yourself and then keying them in. |
| 2. | When you press Enter on your keyboard, each Part scanned in becomes a detail line in the DataView below, with a default Quantity of 1. |
| 3. | However, if no Parts record is found with a matching UPC Code, you will receive the following message and will not be allowed to enter this Part: |

Fields: (For help with data entry, see Field Select Boxes and Field Helpers.)
UPC Code:
The Universal Product Code is the Bar Code value that the scanning device reads in. This matches the UPC Code field for a Part on its General Tab, so this identifies a Part from your Company's Parts List as it fills in the detail lines in the screen below.
Note: In order to utilize Scan Parts, you need to prepare the General Tab on your Parts records to contain this UPC Code, to avoid the message above.
The Company Preferences Required Fields Tab allows you to make UPC Code a Required field for entering a Part, if you desire.
Quantity:
You need to indicate the Quantity of the Part scanned. The default is one. To change this, click on any detail line and then hit the Numeric Pad value for Plus and Minus (+, -) to increase or decrease the value here.
When scanning is complete:
Click OK to exit the screen and save the Parts captured here to the function from which you requested Scan Parts.
Page url: http://www.fieldone.com/startech/help/index.html?_inventmanage_parts_use_bar_code_scanner_.htm