Navigation: Basic Working Procedures > Inventory Management >
Vendors


|
Navigation: Basic Working Procedures > Inventory Management > Vendors |
|
A Vendor is a company that sells you products, used when you are ordering supplies. For instance, the Vendor might be a distributor.
See related topics:
To Set up Vendors:
On the Work Menu at the top of the screen, click the Inventory down-arrow, and select Vendor Lookup

The full-size Lookup screen will appear. (To add or change a record, see Large Lookup, Add or Edit.)
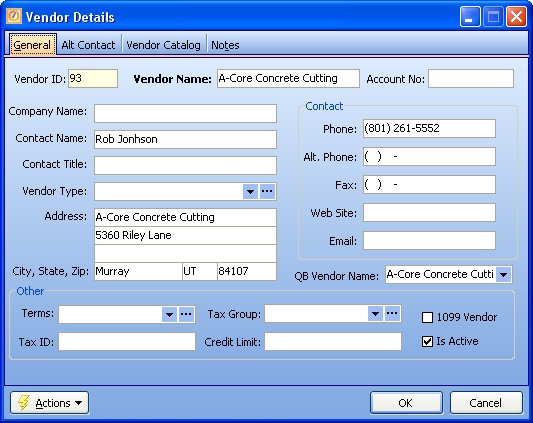
The Vendor Details screen contains four Tabs:
Here you collect the basic information to describe this Vendor.
Fields: (For help with data entry, see Field Select Boxes and Field Helpers.)
General:
Vendor ID:
Protected. Automatically generated when you save a new Vendor.
Vendor Name:
Required. Unique name use to display and sort Vendors. It may have been supplied through QuickBooks Import. If you change this name and use QuickBooks, make sure that the original Name is kept in the QB Name field below.
Account No.:
The Account Number which this Vendor uses to identify your Company .
Company Name:
Sometimes you need to store additional information beyond the Vendor Name above.
Contact Name:
The Vendor employee who handles your Company's business. The Alt Contacts Tab allows you to enter additional persons.
Contact Title:
The title of the Vendor employee who handles your Company's business. The Alt Contacts Tab allows you to enter additional persons.
Vendor Type:
You may choose to classify your Vendors, using Vendor Type. (See Lookup Combo Box. To add an entry, click the Ellipsis button ( ) and select New.)
Vendor Address:
Enter the full address which will be used to mail Purchase Orders.
If the Vendor name in FieldOne differs from the Vendor Name in QuickBooks, use this field to link them. Over time there may be reasons to change the Import name, but then you must store the original value here. (For more details refer to Understand QuickBooks Naming Exceptions.)
Note: The QB Vendor Name list is only available after running QuickBooks Integration.
Contact:
Phone, Alt. Phone, Fax, Web Site, Email:
Enter as many of the above as you need. The Alt Contacts Tab allows you to enter additional persons.
Other:
The Payment Terms currently offered to you by this Vendor. (See Lookup Combo Box. To add an entry, click the Ellipsis button ( ) and select New.)
Tax ID:
The Vendor would supply the Tax Identification number.
Tax Group:
If this Vendor requires Sales Tax, then you must also select a Tax Group. (See Lookup Combo Box. To add an entry, click the Ellipsis button ( ) and select New.)
Credit Limit:
The Vendor may have set a Credit Limit for your Company, which you can keep on file here.
1099 Vendor:
The 1099 Flag is useful for exporting data to be used in tax reporting on 1099 Forms.
Is active:
The default for the Lookup screen is to show Only Active records. You can remove the check-mark from the select-box on that screen and view all.
In this Tab you identify any Alternate Contacts associated with this Vendor.

This screen, with multiple details, is a DataView, where you can adjust the layout, print or export the data (see DataView Menu). There may also be a header panel above for the "parent" of the details, or a DataView Footer below.
Since the first row in the details says, "Click here to add new...." this is a Direct Data Entry screen, where you add or make changes to the lines themselves, using the Data Entry Icons and Paging Icons at the bottom.
Here you enter additional information that may helping in making contact. You can enter an unlimited number of Alternate Contacts.
For each one you can display how to make contact:
Phone |
Mobile |
Fax |
Alt Phone |
Pager |
This Tab contains the Parts list updated through Import Vendor Catalog or maintained manually.
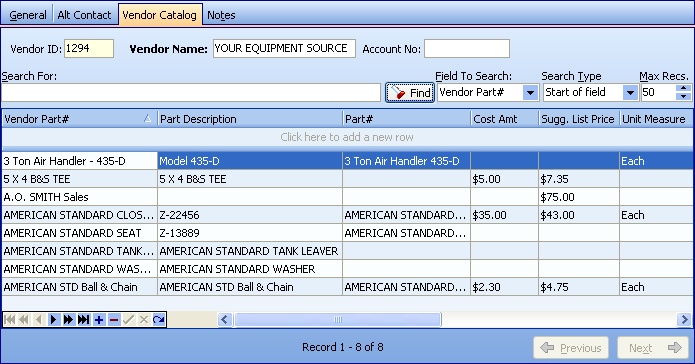
This screen, with multiple details, is a DataView, where you can adjust the layout, print or export the data (see DataView Menu). There may also be a header panel above for the "parent" of the details, or a DataView Footer below.
Since the first row in the details says, "Click here to add new...." this is a Direct Data Entry screen, where you add or make changes to the lines themselves, using the Data Entry Icons and Paging Icons at the bottom.
Use the Horizontal Scroll Bar at the bottom of the window to see further valuable columns on the right.
| • | Although you can enter or maintain Vendor Part detail lines, for large Parts lists you probably want to save time by using Import Vendor Catalog. |
| • | The fields to be maintained here match those on the Parts General Tab. |
| • | The exception is Vendor Part # (required), which is the name or number that the Vendor uses to list and sell this Part. If several Vendors supply you with the same Part in your Parts list, each Vendor may still have a different Catalog ID for that Part as they stock it and list it for sale to you. |
| • | Another field worth mentioning is Manufacturer Part #, which gives a unique identification for this Part, possibly ordered from several different Vendor lists. |
Page url: http://www.fieldone.com/startech/help/index.html?_inventory_management_vendors_.htm