Navigation: Basic Working Procedures > Schedule Board > Perform Schedule Tasks > Post Multiple or Single Schedule Slots >
Use Post Schedule Slots Screen


|
Navigation: Basic Working Procedures > Schedule Board > Perform Schedule Tasks > Post Multiple or Single Schedule Slots > Use Post Schedule Slots Screen |
|
When you Use the Post Schedule Slots Screen, you take several steps to transfer the Schedule Slot history to the Work Order(s) concerned:
| 1. | Complete the Slot Details information for each selected Schedule Slot |
| 2. | Select the Actions to follow the Posting process: |
| • | Create Invoices for Posted Schedule Slots |
| • | Print Work Orders for Posted Schedule Slots |
Here is a sample Post Schedule Slots screen:
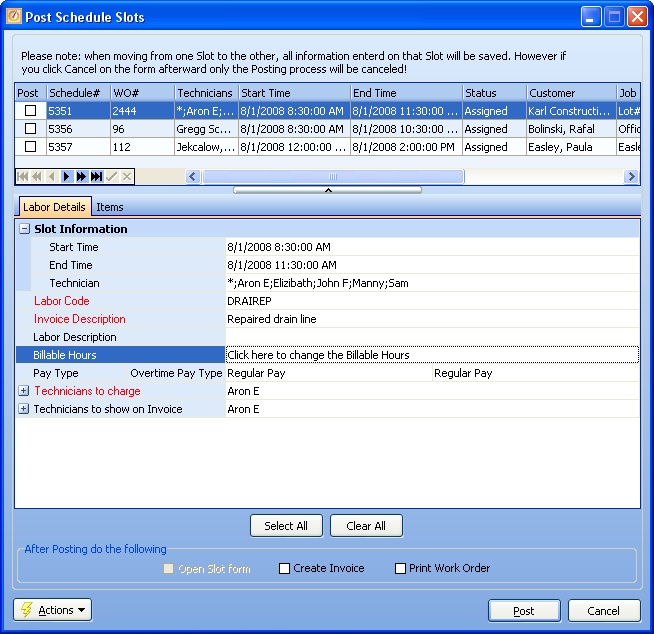
On the Post Schedule Slots screen if you are posting more than one Schedule Slot a DataView List appears at the top showing multiple detail lines.
When there is only one Schedule Slot selected to post, the screen shows only the Slot Details Panel. Use this to process the Labor Tab and optional Items Tab.
DataView list of Schedule Slots:
| • | If posting from the Schedule Board (rather than the Office Manager Unposted Slots Sub-Tab), then only Schedule Slots which fall in one of the selected dates on the Date Navigator will appear here for Posting. |
| • | You can use normal DataView tools here and key-search for specific entries, like the Customer or Technician name. |
| • | Notice the Select All and Clear All boxes at the center bottom of the screen for convenience in filling the Post check-box for multiple detail lines. To save time, use a button and then select or de-select exceptions. |
| • | When you have highlighted a detail line, it appears in the Slot Details Panel on the Labor Tab, where you finalize related Posting fields. |
The bottom portion of the screen will display another panel with the individual Schedule Slot Detail Tabs for Labor and Items for you to finalize information required for Posting. The Items Tab is optional.
For multiple Schedule Slots this panel appears for each one as you check it off or select and highlight it above. You should complete this panel to make each one ready to Post.
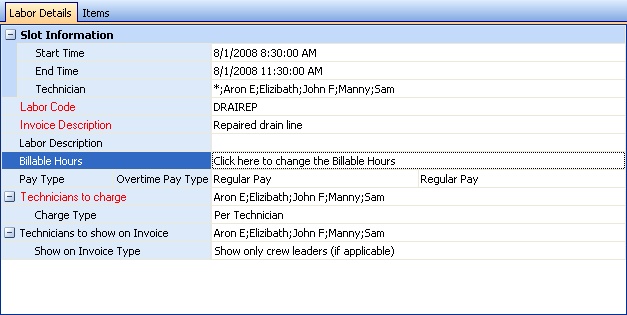
On this display of the Schedule Slot all the fields colored red on the Labor Detail Tab are Required for Posting.
Note: Since Project billing is determined on the Estimate, fields related to Invoicing either do not appear for a Project or are not required.
Fields: (For help with data entry, see Field Select Boxes and Field Helpers.)
Start and End Times:
Defaults to the values reflected by the Schedule Slot as it was situated on the Schedule Board. You can change these for accuracy or some other reason. (Click to use Calendar and Clock Helper.)
Technician:
Defaults to the Employee or Crew assigned to this Schedule Slot, to show who actually worked here. You can select or de-select members of the Crew, for accuracy. (Use the predefined Simple Lookup Box.)
Note: The other Technician fields below also allow selection, and are used for creating Invoices.
Labor Code:
Required. This field might be empty or have an incoming default from one of the following:
| • | Schedule Slot Details entry |
| • | Mobile device entry from the field Technician |
| • | Agreement Scheduling Tab entry containing Labor Code |
You need to tell what type of work was done. Be aware of how the chosen code fits into any Agreement or Customer Special Pricing. (For advanced work, see also Pricing Tables.) Select a Labor Code. (See Lookup Combo Box. To add an entry, click the Ellipsis button ( ) and select New.)
Invoice Description: For Service Calls only. (Billing for Projects covered in Estimate.)
Required. Defaults from the Labor Code selected above. You can change this.
You can use this field to contain a Description that you enter to print in a Line Group on the Invoice if the Company Preferences Work Order Tab has the control set so that Labor Detail Lines are suppressed and a Line Group will be used instead.
Labor Description:
Optional. You can enter something that describes the Labor. like technical details of the work performed, that is not needed and will not appear on the Invoice.
Billable Hours: For Service Calls only. (Billing for Projects covered in Estimate.) (Billing for Projects covered in Estimate.)
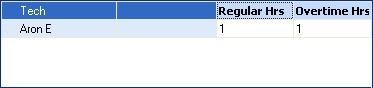
Defaults to actual values for Regular and Overtime Hours. When you click on the Billable Hours field, you see the Types of Hours worked.
| • | If you review the Schedule Slot as it sits on the Schedule Board, you will see that these hours have been calculated automatically in relation to parameters defining Regular Working hours for the Company and Employee (see Employee Work Hours and Work Days). |
For instance, a single Schedule Slot may stretch over or "straddle" the borderline for Overtime Hours, or may be placed in a Company Holiday.
| • | The actual type of hours worked shows here. You can change the entries in the columns. You can even reduce Billable Hours to zero, for some or all Technicians, if desired. |
| • | As a result of Posting, for each type of Billable Hours that has any time included (Regular and Overtime Hours) a separate Labor record will be created on the Work Order Items Tab. A Schedule Slot for a Crew or multiple Employees will also produce separate Labor records for each person with Billable Hours of some type. |
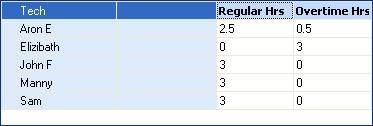
| • | In the example below, five Employees would generate six records on the Work Order, four for Regular Hours and two for Overtime Hours: |
| • | When working with the Billable Hours field above, be careful how you select the values for the two Pay Type and Overtime Pay Type fields below. |
For example, in the screen image above, some work has been determined to be Overtime hours, but both the Pay Type and the Overtime Pay Type show the choice of Regular Pay, meaning that the Invoice will bill the Overtime hours at the Regular Pay rate.
Pay Type and Overtime Pay Type: Used for both Service Calls and Projects, since this relates to Job Cost.)
There are two fields here. Both contain defaults from the Company Preferences Work Order Tab. These fields allow you to select a Pay Type (such as Regular, Overtime, Weekend, Vacation, Special) which you have defined according to the needs of your Company.
You can select a different Pay Type. (See Lookup Combo Box. To add an entry, click the Ellipsis button ( ) and select New.)
Review both fields carefully in relation to the choice made above in Billable Hours.
Technicians to Charge: For Service Calls only. (Billing for Projects covered in Estimate.)
Required. Defaults to the Employee or Crew assigned to this Schedule Slot. You can select or de-select members of the Crew, to suit the Labor Charge Type field below. (Use the predefined Simple Lookup Box.)
Labor Charge Type: For Service Calls only. (Billing for Projects covered in Estimate.)
Click on the Open-Shut Icon (+) to view the default from the Company Preferences, Work Order Tab. You can make a different selection from the Simple Lookup Box.
Technicians to Show on Invoice: For Service Calls only. (Billing for Projects covered in Estimate.)
Defaults to the Employee or Crew assigned to this Schedule Slot. You can select or de-select members of the Crew to suit the Show on Invoice Type field below. (Use the predefined Simple Lookup Box.)
Show on Invoice Type: For Service Calls only. (Billing for Projects covered in Estimate.)
Click on the Open-Shut Icon (+) to view the default from the Company Preferences, Work Order Tab. You can make a different selection from the Simple Lookup Box.
| • | On the Items Tab, you can enter Parts used on the call, which will be transferred to the Items Tab of the Work Order for billing and costing. (The screen design here has many useful features and techniques. Please refer to the Work Order screen, Items Tab, as the model for the different panels on all Items Tab entry screens.) |
| • | The Items Tab on the Posting Schedule Slot screen will also accept new Labor entries (like any Items screen), but will display a Warning Message if you try to add new Labor at this time, since you are already recording the Labor from this particular Schedule Slot. |
| • | In addition, on the Items Tab on the Posting Schedule Slot screen you can set up Line Groups to combine and mask various Detail Lines. (See Work Order Items Tab, Line Groups for further description of how to create and use Line Groups.) |
| • | For more information see Record Parts while Posting |
![]()
| • | Open Slot Form - when posting a single Schedule Slot, click to review the Slot Details screen afterwards |
| • | Create Invoice - click to Create Invoices for any Service Calls after you Post |
| • | Print Work Order - click to Print the Work Order Report after you Post |
Posting Process:
| • | For each Schedule Slot, make sure that you have reviewed the Labor Detail Tab for all Schedule Slot details that you intend to post including the fields colored red as required for posting |
| • | Multiple Schedule Slots - make sure to use the Post check-box. Only checked-off selections will Post. |
When ready to Post:
Click on the Post button at the bottom right of the screen
Page url: http://www.fieldone.com/startech/help/index.html?_sched_slot_tasks_post_use_post_screen_.htm