Navigation: Basic Working Procedures > Employees > Display the Employee Screen >
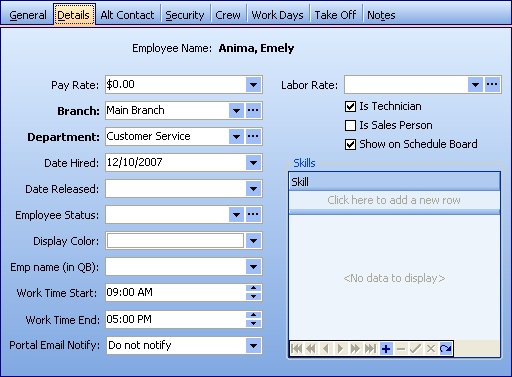
Details Tab


|
Navigation: Basic Working Procedures > Employees > Display the Employee Screen > Details Tab |
|
The Details Tab describes the Work and Pay related to the Employee.
Fields: (For help with data entry, see Field Select Boxes and Field Helpers.)
Left Side:
The amount this Employee costs the Company per hour, including all overhead costs. This field will determine your Labor Costs for a specific Work Order. In order to track Profit & Loss for Work Orders accurately you need to enter Pay Rates for Technicians precisely.
For example: In order to include all overhead costs such as insurance and taxes, one way to calculate this figure is to run a report in your previous accounting software of the total expenses paid out for this Employee in a given year and then divide that figure by the number of hours worked during that year. Enter the result into the Pay Rate field.
Required. The Company Branch this employee is associated with. (See Lookup Combo Box. To add an entry, click the Ellipsis button ( ) and select New.)
This value will be used when creating new transactions like Work Orders, Agreements, Invoices and Purchase Orders, to associate that transaction with the Branch of the Logon User ID making the entry. (However sometimes the Branch on a Job Site will override the branch of the Employee entering the transaction.)
Department:
Required. The Company Department this Employee belongs to. (See Lookup Combo Box. To add an entry, click the Ellipsis button ( ) and select New.)
Date Hired:
The date of hire for this Employee. (Click on down-arrow for Calendar Helper.)
Date Released:
End of employment for this Employee. (Click on down-arrow for Calendar Helper.)
The current Employee Status of this Employee, such as Sick, On Vacation, etc. (See Lookup Combo Box. To add an entry, click the Ellipsis button ( ) and select New.)
Display Color (used on Schedule Board):
When you select a color for Employee, the Schedule Board column heading Name will then appear in that color. This helps when you show many Technicians on the Schedule Board. (See Schedule Board, Select Technicians and Schedule Board, Change Color for Technician.
Not required unless conditions met. If you are using QuickBooks, the original Employee General Tab Display Name was imported from the Employee Name in QuickBooks. Any later change to the Display Name requires the original QB Import entry in this QB Employee Name field to keep the link to QuickBooks. (See Understand QuickBooks Naming Exceptions.) Selection from the predefined Simple Lookup Box.
Work Time Start and Work Time End:
Default from Company Preferences, Schedule Board Tab. You can specify the time this particular Employee starts and ends the daily shift.
The Schedule Board will display darker colors for off-hours and lighter colors for working hours individually for every Employee. This helps prevent unintentional scheduling during off-hours. (See Post Schedule Slots Screen for an example of how the Billable Hours and Pay Types fields are affected by these values.)
See the Employee Work Days Tab for Lunch Hour, Work Days, and Vacation Days.
When this flag is set on, the Employee will receive emails relating to Web Portal Activity for all Customers using the Web Portal. This may be appropriate only for certain Employees, like the Dispatcher.
If the you wish Web Portal emails received by Employees to be restricted to certain Customers, you should enter this Employee as a Customer Portal User instead of setting on this flag here.
Use the Simple Lookup Box to choose either one:
| • | Notify User |
| • | Do Not Notify |
Right Side:
This field is only used when you want an override for this specific Technician that replaces the Labor Rate for the Work Order Type. It is quite rare to use this field. (See Lookup Combo Box.To add an entry, click the Ellipsis button ( ) and select New.)
To remove an existing entry in this field, place the cursor at the last letter of the entry and use the Backspace key to eliminate all characters. When you are done, the field will be empty and you can update the record to have it stay that way.
Note: If the Labor Rate you charge for a Work Order depends on override entries found on the Customer Special Pricing Tab or Labor Code or Agreement Labor Rates, you would leave this field empty. (See Rules of Pricing.)
Checkbox selection signifies that this Employee is a Technician and will appear in predefined Technician Simple Lookup Boxes.
Selecting this field will also automatically select Show In Schedule Board and will create a Crew Tab for this Employee. (If desired, you can unclick Show In Schedule Board and leave the Crew Tab empty.)
Is Sales Person:
Checkbox selection signifies that this Employee is a Sales Person and will appear in predefined Sales Person Simple Lookup Boxes.
Checkbox selection signifies that this Employee shows among the selections in the lookup box for Select Technicians to Display on the Schedule Board. You can use this even for Employees who are not Technicians, such as Estimators for Projects.
In this box you can add multiple details for Employee Skills for this Employee. When a Problem Code for a Service Call lists a certain Skill Required and this Employee does not have the named skill, you will receive a warning message. (See Lookup Combo Box. To add an entry, click the Ellipsis button ( ) and select New.)
Page url: http://www.fieldone.com/startech/help/index.html?_employee_screen_details_tab_.htm