Navigation: General Company Settings > Company Preferences >
Work Order Tab


|
Navigation: General Company Settings > Company Preferences > Work Order Tab |
|
The numerous controls found in the Work Order Tab allow you to customize Work Orders to suit the way that your Company does business.
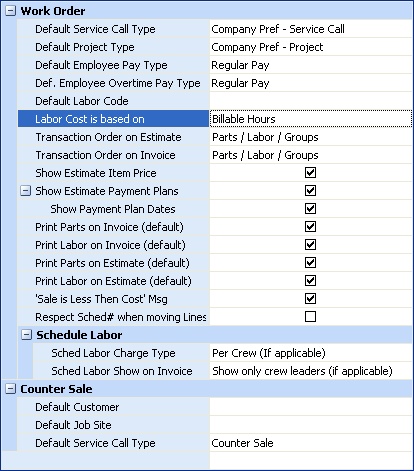
Fields: (For help with data entry, see Field Select Boxes and Field Helpers.)
Default Service Call Type:
Sets the default Work Order Type for creating a new Service Call. (See Lookup Combo Box. To add an entry, click the Ellipsis button ( ) and select New.)
Default Project Type:
Sets the default Work Order Type for creating a new Project. (See Lookup Combo Box. To add an entry, click the Ellipsis button ( ) and select New.)
Default Employee Pay Type:
Sets the default Regular Hours Pay Type to be used upon when Posting a Schedule. (See Lookup Combo Box. To add an entry, click the Ellipsis button ( ) and select New.)
Def. Employee Overtime Pay Type:
Sets the default Overtime Hours Pay Type to be used upon when Posting a Schedule. (See Lookup Combo Box. To add an entry, click the Ellipsis button ( ) and select New.)
Default Labor Code:
Sets the default Labor Code (if any) used on Work Order Item Detail lines. (See Lookup Combo Box. To add an entry, click the Ellipsis button ( ) and select New.)
Labor Cost is Based on:
Sets the default basis of the Labor Charge, using predefined choices from the Simple Lookup Box:
| • | Actual Hours |
| • | Billable Hours |
On the Post Schedule Slots screen you are allowed to Change Billable Hours, indicating which of the Actual Hours will be billable and with which Pay Type. Here you determine whether it is Company policy to calculate Labor Cost using the Actual or Billable hours.
Transaction Order on Estimate:
Select-box for the order in which transactions appear when you Print an Estimate:
| • | Line Groups - from the Estimate |
Select-box for the order in which transactions appear when you Print an Invoice.
| • | Line Groups - from the Invoice (See Work Order Items Tab, Line Groups for a general explanation) |
Show Estimate Item Price:
Check-box to select the default to display detail line Item Prices when you Print an Estimate. You can change this on the each individual Estimate General Sub-Tab.
Project Estimate - Payment Plans:
Show Estimate Payment Plans:
Check-box to select the default to display the Payment Plans when you Print an Estimate.
Show Payment Plan Dates:
Check-box to select the default to display Payment Plan Dates (if any) when you Print an Estimate.
Print Parts on Invoice:
Check-box to select the default to display Parts Detail Lines when you Print an Invoice. (For alternatives in printing Detail Lines, see Line Group Types and Work Order Items Tab, Line Groups for explanation)
Check-box to select the default to display Labor Detail Lines when you Print an Invoice. (For alternatives in printing Detail Lines, see Line Group Types and Work Order Items Tab, Line Groups for explanation)
Print Parts on Estimate:
Check-box to select the default to display Parts Detail Lines when you Print an Estimate. (For alternatives in printing Detail Lines, (For alternatives in printing Detail Lines, see Line Group Types and Work Order Items Tab, Line Groups for explanation)
Print Labor on Estimate:
Check-box to select the default to display Labor Detail Lines when you Print an Estimate. (For alternatives in printing Detail Lines, (For alternatives in printing Detail Lines, see Line Group Types and Work Order Items Tab, Line Groups for explanation)
'Sale Less than Cost' Msg:
Check-box to trigger a Warning Message when recording Parts and Labor Detail Lines if the Cost exceeds the Sales Amount.
Schedule Controls:
Select-box - relates only to Service Calls. Sets the default when Posting the Schedule Slot creates Labor Records and you have multiple Technicians for one Schedule Slot. (You can change the default on the Posting Screen.)
| • | Per Technician: creates a Labor Detail for each Technician showing the name and charging the Customer, using the hourly rate for this Work Order. |
For example, if two Technicians work for one hour and the Hourly Rate is $100.00, there will be two detail lines, one for John and one for Joe, each with a charge of $100, for a total of $200.00.
| • | Per Crew (if applicable): If there are any Crews on the Schedule Slot, the charge to the Customer will be the hourly rate for each crew on the Schedule. |
Schedule Labor show on Invoices:
Select-box - relates only to Service Calls. This field controls how Labor Detail Lines should appear on Invoices generated if multiple Technicians were assigned to the Schedule Slot. (You can change the default on the Posting Screen.)
| • | Show all Technicians: The Customer Invoice shows all Labor Details created while Posting the Schedule Slot. |
| • | Show only Crew Leaders: The Customer Invoice shows only the Labor Details created for a Crew Leader while Posting the Schedule Slot. |
| • | Do not print on Invoice (but create a Line Group): The Customer Invoice suppresses all Labor Details created while Posting the Schedule Slot. |
| ► | Instead it shows a Line Group using the Description specified in Invoice Description when Posting the Schedule Slot and will attach all the labor records to newly created Line Group. |
| ► | This selection is very useful if you wish to hide all Labor Details and only display a description of the scope of the work. |
| • | Do not print on Invoice: The Customer Invoice suppresses all Labor Details created while Posting the Schedule Slot. |
| ► | In this case you need to create a Line Group manually in order to include the Labor Details. (For alternatives in printing Detail Lines, see Line Group Types and Items Tab, Line Groups for explanation) |
| ► | Choose this selection rather than the one above when you wish to combine some Parts as well as some Labor into a single Line Group, or when you wish to totally suppress Labor details, as on an Agreement. |
Counter Sale Controls:
Defines a "default Customer" to use when creating a Counter Sale transaction. You can use the words "Counter Sale," if you like. Select from predefined Customers in Simple Lookup Box. If you wish to have a "Counter Sale Customer," then set this entry up beforehand.
Counter Sale Job Site:
Defines a "default Job Site" to use when creating a Counter Sale. Select from predefined Customer Job Sites belonging to the Customer above. Use the Simple Lookup Box. If you wish to have one or more "Counter Sale Job Sites," then set these up beforehand as Job Sites attached to the "Counter Sale Customer."
Counter Sale Call Type:
Defines a default Work Order Type to use when creating a Counter Sale transaction. (See Lookup Combo Box. To add an entry, click the Ellipsis button ( ) and select New.)
Page url: http://www.fieldone.com/startech/help/index.html?_companypreferences_work_order_.htm