Navigation: Basic Working Procedures > Service Agreements > Display the Agreement Screen >
Scheduling Tab


|
Navigation: Basic Working Procedures > Service Agreements > Display the Agreement Screen > Scheduling Tab |
|
You can use the Scheduling Tab to set up planned work for this Agreement. The entries you create here differ from those on the Schedule Tab on a Work Order in three ways:
| 1. | No actual Schedule Slot is created on the Schedule Board at this time. Instead, entries appear on the Agreements Sub-Tab of the Office Manager Schedule Tab. On that screen you select entries from Agreements and use the Process Schedule button to create Schedule Slots. |
| 2. | There are no Work Orders related to entries on the Agreement Scheduling Tab, until you generate a Schedule Slot. |
| ► | When a Schedule Slot is created on the Schedule Board, a new Service Call is created at the time of creating the related Schedule Slot. |
| ► | Also, you can start a Service Call and associate it with an Agreement when you fill in the General Tab of the Work Order. |
| 3. | For Time of Service Agreements, only Planned Service Calls, originating from Schedule Slots on this tab, will contain Agreement Charges on their Invoice, representing Planned Charges for this Agreement. |
Note: Any extra, special needs Service Calls that are also attached to this Agreement (but not entered through this Scheduling Tab) will not contain Agreement Charges on their Invoice.
Here is a sample Scheduling Tab screen:

This screen, with multiple details, is a DataView, where you can adjust the layout, print or export the data (see DataView Menu). There may also be a header panel above for the "parent" of the details, or a DataView Footer below.
Since the first row in the details says, "Click here to add new...." this is a Direct Data Entry screen, where you add or make changes to the lines themselves, using the Data Entry Icons and Paging Icons at the bottom.
Note the Open-Shut Icons (+) that allow you to Enter Planned Parts for the Service Call, as described below.
In the screen above the Create Recurrence button was used to generate most of the details. These are marked with the check-mark in the Recur column at the right. If you enter details manually, this check-box is empty. (See also, View Recurrence, below.)
Fields: (For help with data entry, see Field Select Boxes and Field Helpers.)
Schedule Date:
Date and Time to put entry onto Schedule Board. Make sure that Time is included here, or the entry will not appear. (See Calendar and Clock Helper.)
Technician:
Defaults to Unassigned Technician. Select Technician or Crew for the work. Note the asterisk (*) beside name designating Crew leader, so here you are able to select one or multiple single Technicians, or a Crew. Schedule Slots for this Date and Time will be created Labor code:
The Labor Code used in pricing and billing. (See Lookup Combo Box.To add an entry, click the Ellipsis button ( ) and select New.)
Note: This Labor Code may or may not relate to Labor Codes entered for Discount Coverage.
Duration:
The planned length of time for when the Schedule Slot is created on the Schedule Board.
Note:
A short reminder entered here will show later on the Schedule Slot. Some sort of reminder about this Agreement.
Status:
The three choices in the Simple Lookup Box appear in the illustration above. These are:
| • | Active - the Schedule Tab entry is ready to be created into a Schedule Slot using the Agreements Sub-Tab of the Office Manager Schedule Tab |
| • | Processed - the Schedule Slot has been created on the Schedule Board and the new associated Work Order appears in the next column |
| • | Canceled - a user has manually changed the Status of this prepared entry |
Work Order:
Protected. Displays the new Work Order created along with the Schedule Slot
Schedule ID:
Protected. Displays the ID number of the new Schedule Slot
Recur:
Protected. Indicates whether or not this entry came from using the the Create Recurrence button.
You are allowed to create more than one Recurrence pattern of scheduled work.
For instance, you may have Day Shift and Night Shift workers, or workers of other types assigned to work on the contract, who have entirely different schedules.
View Recurrence button - click this and then a small panel next to the button shows existing Recurrences and Date Ranges. Click to select a Recurrence and the Schedule Recurrence screen for this one will appear.
![]()
To create a new one, click the Create Recurrence button.
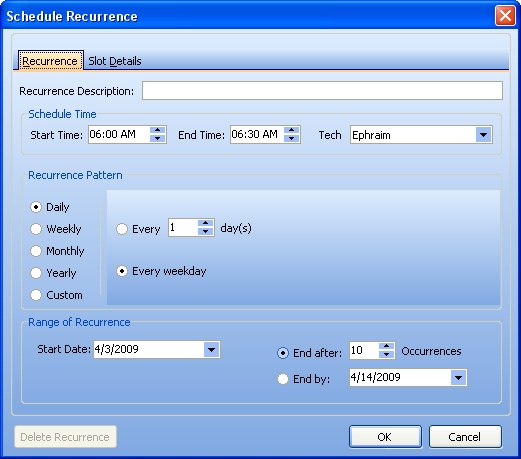
The Schedule Recurrence screen will appear:
Fields: (For help with data entry, see Field Select Boxes and Field Helpers.)
Recurrence Description:
A short description that identifies this particular type of recurring work.
Start and End Time:
Adjust the times to show when the visit starts and ends. (See Increase/Decrease arrows.)
Technician:
Select Technician or Crew for the work. Note the asterisk (*) beside name designating Crew leader, so here you are able to select one or multiple single Technicians, or a Crew. Schedule Slots for this Date and Time will be created for as many Technicians as are selected here. (See Simple Lookup Box.)
Labor code:
The Labor Code used in pricing and billing. (See Lookup Combo Box.To add an entry, click the Ellipsis button ( ) and select New.)
Note: This Labor Code may or may not relate to Labor Codes entered for Discount Coverage.
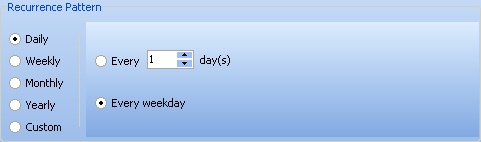
Recurrence Pattern fields:
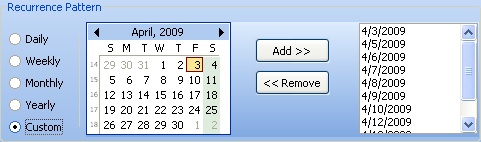
First select a period for the recurrence on the left, which allows Daily, Weekly, Monthly, Yearly and Custom Recurrence Periods. Then fill in the related selections for that choice shown on the right side.
Note that the Custom button brings up all the Dates already set by a periodic Pattern and also a Calendar that allows you to click to select exceptional Dates. Then click the Add (and Remove) button to change the preset list of dates on the right:
Range of Recurrence:
First select a Start Date. Then use either the Number of Occurrences field or the End By Date. (See Calendar Helper for dates.)
Click the Open-Shut Icons (+) to access the entry lines for Parts on any given schedule Date and then enter as many Parts as needed.

You can review the Planned Parts using the Agreements Report for Parts Expected Usage.
Part #:
The Part planned for the recurring contract work. (See Popup Lookup Combo Box, used for large Parts lists. To add an entry, click the Ellipsis button ( ) and select New.)
Note: This Part may or may not relate to Parts entered for Discount Coverage.
Note: The remaining fields, except those for Quantity, come from the General Tab for this Part. However, you can change them.
Quantity #:
Required for a Planned Part to be entered here.
Unit of Measure:
Default from the General Tab for this Part. You can change the Unit of Measure, and this will affect the Extended Quantity below. (See Lookup Combo Box. To add an entry, click the Ellipsis button ( ) and select New.)
For example, if the U/M of the Part is 'Each' and you change this to "Case of 12," the Quantity you enter will be multiplied times 12 for the Extended Quantity
Extended Quantity:
Protected - calculated result of Quantity times Unit of Measure Quantity.
Description:
Default from the General Tab for this Part. You can change or add to this.
Page url: http://www.fieldone.com/startech/help/index.html?_agreement_screen_scheduling_tab_.htm