Navigation: Basic Working Procedures > Work Orders > Display Work Order Details Screen >
The Schedule Tab


|
Navigation: Basic Working Procedures > Work Orders > Display Work Order Details Screen > The Schedule Tab |
|
It is easy to use the Schedule Tab to set up work for the job. You will even find a "miniature Schedule Board" designed for this particular Work Order.
Note that if there is a Preferred Technician selected on the Work Order General Tab, the name is indicated in the header. This helps because all new Schedule Slots default to Unassigned Technician, allowing you to make the selection.
Tip: On the right in the header, you can click the Show Completed box to show or hide Completed and Posted Schedule Slots. (See Status.)
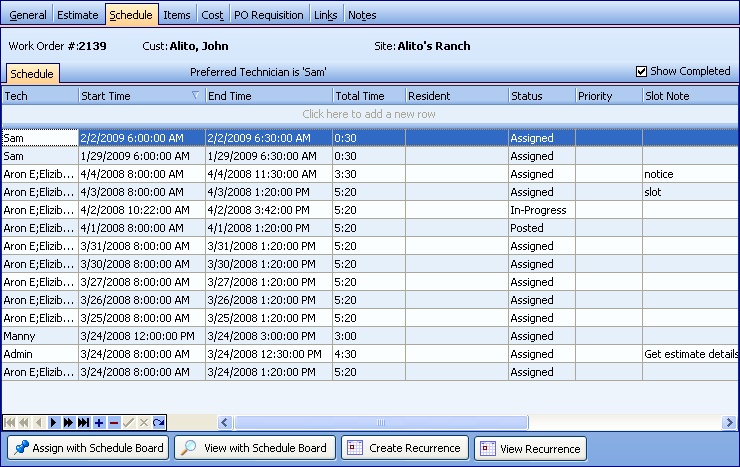
In the example above, four buttons show at the bottom:
| • | Assign with Schedule Board - use "Mini-Schedule Board" with defaults set from this Work Order: |
| • | View with Schedule Board - select a Schedule Slot here on the details screen and click the button. The "Mini-Schedule Board" will appear with this date and related Schedule Slot(s). |
| • | Create Recurrence - create (possibly multiple) automatically repeating Schedules for this job |
| • | View Recurrence - click and then a small panel next to the button shows existing Recurrences and Date Ranges. Click to select a Recurrence and the Schedule Recurrence screen will appear. |
![]()
Here we discuss the screen above where you enter or change Schedule Slots.
This screen, with multiple details, is a DataView, where you can adjust the layout, print or export the data (see DataView Menu). There may also be a header panel above for the "parent" of the details, or a DataView Footer below.
Since the first row in the details says, "Click here to add new...." this is a Direct Data Entry screen, where you add or make changes to the lines themselves, using the Data Entry Icons and Paging Icons at the bottom.
Fields: (For help with data entry, see Field Select Boxes and Field Helpers.)
Technician:
Defaults to Unassigned Technician. Note the Preferred Technician indicated above in the header as a reminder. Select Technician or Crew for the work. Note the asterisk (*) beside name designating Crew leader, so here you are able to select one or multiple single Technicians, or a Crew. Schedule Slots for this Date and Time will be created for as many Technicians as are selected here. (See Simple Lookup Box.)
Start/End time:
Defaults to the first half hour of the next working day for (first) selected Technician. You can change this. (Click to use the Calendar Helper.)
Total Time:
Protected. The time period between Start and End Time.
Resident:
The Resident unit, if any, at the Job Site where the Technicians do the work. (See Lookup Combo Box. To add an entry, click the Ellipsis button ( ) and select New.)
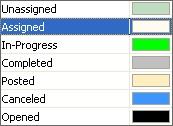
Status:
Defaults to Unassigned Status during entry (and to Assigned, if a Technician is selected, after you save and exit. You can manually change some Status values here. (See Simple Lookup Box.)
Priority:
The default comes from the General Tab of the Work Order, if any. Select a Priority, if desired, according to the urgency of the schedule. (See Lookup Combo Box. To add an entry, click the Ellipsis button ( ) and select New.)
Slot Note:
Usually used for the internal office to communicate with the field Technicians. See Schedule Slot, General Tab. (Click to use the Drop-Down Text.)
Tech Note:
Usually used for the Technician to leave any notes for the internal office. See Tech Note, General Tab. (Click to use the Drop-Down Text.)
Sched ID:
Protected. Assigned as Schedule Slots are saved and created.
Recurrence:
Protected. Indicates whether this is a Recurring Schedule.
Labor Code:
Select a Labor Code, if desired, describing the type of work and possibly setting the Labor Rate. See Basic Pricing.
(See Lookup Combo Box. To add an entry, click the Ellipsis button ( ) and select New.)
Print Work Order Report:
Click this button inside the detail line to Print a Work Order Report for this Technician.
Page url: http://www.fieldone.com/startech/help/index.html?_work_order_screen_scheduletab_.htm