Navigation: Basic Working Procedures > Office Manager > Schedule Manager Tab >
Agreement Schedules Sub-Tab


|
Navigation: Basic Working Procedures > Office Manager > Schedule Manager Tab > Agreement Schedules Sub-Tab |
|
The Agreement Schedules Sub-Tab shows the entries created by using the Agreement Scheduling Tab, where Dates and Times for schedules are planned, but no actual Schedule Slots are created. Those entries are placed here, ready for someone using the Office Manager to actually put them on the Schedule Board.
There are no Work Orders related to entries on the Agreement Scheduling Tab. When you Process an entry here, at the same time that a Schedule Slot is created on the Schedule Board, a new Service Call is created.
Here is a sample Agreement Schedules screen:
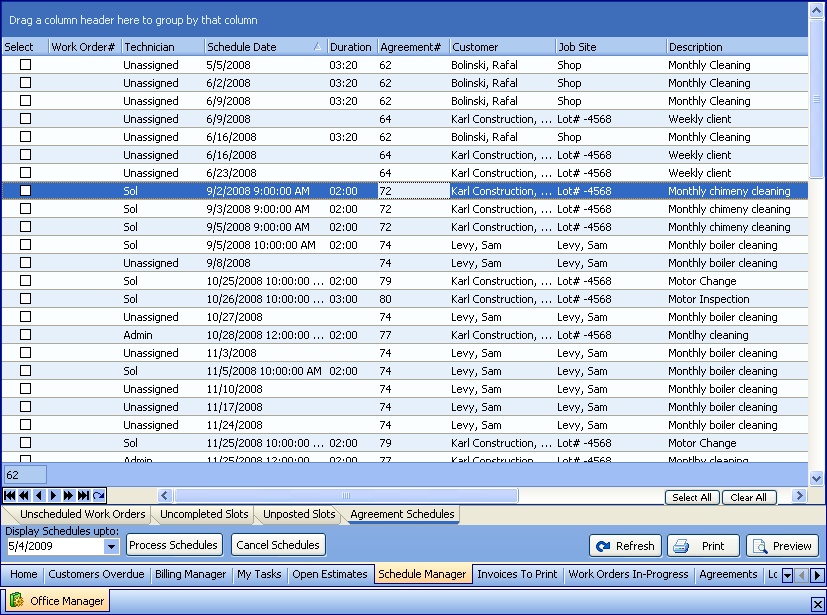
This screen, with multiple details, is a DataView, where you can adjust the layout, print or export the data (see DataView Menu). There may also be a header panel above for the "parent" of the details, or a DataView Footer below. Usually you can use key-matching search on fields like ID Number.
To help you manage many possible entries, this screen is already displayed using the Group-By bar, allowing you to drag column headers into the Group-By in the screen header.
Use the Horizontal Scroll Bar at the bottom of the window to see further valuable columns on the right.
| • | To work with Agreement detail lines on the screen: |
| ► | Double-click on the detail line to open and review or make changes to the Agreement |
| ► | Click the Select Box to add a check-mark and select an Agreement detail line |
| ► | You are allowed to maintain the Time and Date fields on the detail lines. Be sure that all selected detail lines have Time as well as Date. Otherwise, the Schedule Slot will be not be created properly. |
| ► | Use the Process button at the bottom left to perform these actions for all selected details: |
| 1. | Create an actual Schedule Slot on the Schedule Board - you can find this on the Schedule Board. |
| 2. | Create a Service Call for the actual Parts and Labor to be used here - you can find this in the Work Order Lookup. |
| 3. | If the Agreement relates to a single piece of Customer Equipment, then this Equipment will default to the new Work Order on the General Tab. |
| 4. | Remove all Processed details from this screen. |
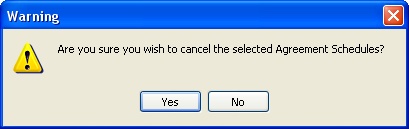
| ► | Use the Cancel Schedules button at the bottom left to remove Schedule Slots checked off in the Select Box. You will receive a warning message. If you continue, these Schedule Slots will be removed from the screen. They will still exist on the Scheduling Tab of the Agreement. |
| • | At the bottom right there are three buttons: |
| ► | Refresh Screen: - Click this button to re-display the screen after making changes to some of the detail lines. |
| ► | Print: - Click this button to print the current screen display for work and review. |
| ► | Preview: - Click this button to preview the printout for the current screen display. |
Page url: http://www.fieldone.com/startech/help/index.html?_off_mgr_schedule_agreements_.htm