Navigation: Basic Working Procedures > Customers and Job Sites > Customers > Display the Customer Details Screen >
Web Portal Tab


|
Navigation: Basic Working Procedures > Customers and Job Sites > Customers > Display the Customer Details Screen > Web Portal Tab |
|
Authorized Employees can use the Web Portal Tab to set up this Customer to access your Company Web Portal. This tab divides into two sub-tabs:
| 1. | Portal Users Sub-Tab - Set up Portal Users who are allowed to enter the Company Portal for this Customer. |
| 2. | Portal Rights Sub-Tab - Customize Access Rights for this Customer inherited from those on the Company Preferences Customer Portal Tab, which can then be inherited for individual Portal Users. |
Here is a sample Portal Users Sub-Tab screen:
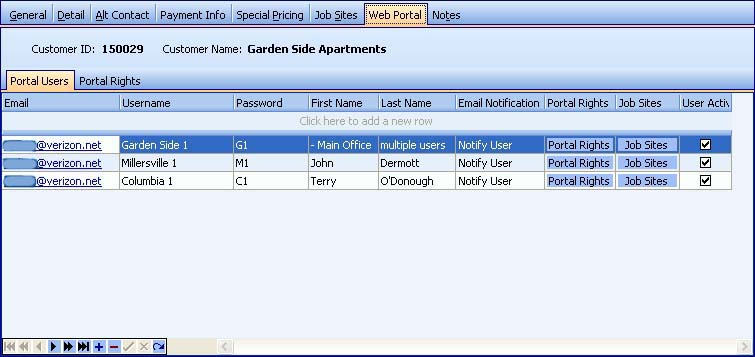
This screen, with multiple details, is a DataView, where you can adjust the layout, print or export the data (see DataView Menu). There may also be a header panel above for the "parent" of the details, or a DataView Footer below.
Since the first row in the details says, "Click here to add new...." this is a Direct Data Entry screen, where you add or make changes to the lines themselves, using the Data Entry Icons and Paging Icons at the bottom.
Fields: (For help with data entry, see Field Select Boxes and Field Helpers.)
Email:
Required. Complete email address to receive potential emails, regardless of value in Email Notification field.
Username:
The Login ID of the Portal User. This could be any of the following:
| • | An individual user representing this Customer |
| • | A group of users from this Customer with similar Access Rights, such as "Main Office" or "Kidder's Field Job Site" |
| • | An Employee of your own Company who may need to: |
| ► | View whatever this Customer's Portal Users are seeing |
| ► | Receive emails regarding this Customer in particular (see Employee Portal Email Notify flag) |
Password:
Required. (You may use upper and lower case, numbers and special characters. The only restriction is that this field is required.)
This field is used for the Greeting field on the Web Portal. You can simply enter the actual first name or nickname of an individual Portal User.
Or you can set up this Login ID for a group of users within the Customer's company who need similar Access Rights, such as the Accounting Department, in which case you might enter here "Accounting."
Last Name:
Again, possibly the actual last name of an individual user, or any other identifying information that you desire. This field does not appear on the Web Portal.
Use the Simple Lookup Box to choose whether or not to send Email Notifications to this Portal User.
Portal Rights:
When you click the Portal Rights field, you get a pop-up screen:
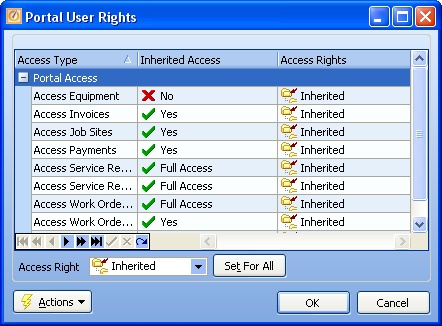
| • | On this screen, "Inherited Access" comes from the settings which apply specifically to this Customer, found on the Portal Rights Sub-Tab below. |
| • | You can set up an individual Portal User with fuller Access Rights that override the Inherited Access from this Customer, as well as those that are more restricted. |
For example, instead of selecting Inherited Rights, which might be "No Access," for some particular Portal User you could say "Full Access." The broader Rights given to this Portal User sign-on will override the more restrictive general Access Rights set for this Customer.
Job Sites:
When you click the Job Sites field, you get a pop-up screen. If no entries are made here, this Portal User will have access to all available Job Sites. Otherwise, you can enter one or more Job Site lines, using the Simple Lookup Box.

This screen, with multiple details, is a DataView, where you can adjust the layout, print or export the data (see DataView Menu). There may also be a header panel above for the "parent" of the details, or a DataView Footer below.
Since the first row in the details says, "Click here to add new...." this is a Direct Data Entry screen, where you add or make changes to the lines themselves, using the Data Entry Icons and Paging Icons at the bottom.
User Active:
Rather than delete the record for a Portal User or group of users using a single Login ID, you can simply un-check the User Active flag to discontinue entrance to this Customer's Web Portal.
Here is a sample Portal Rights Sub-Tab screen:
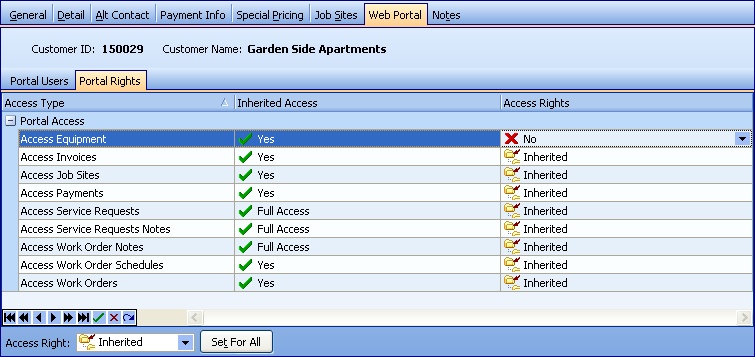
This screen, with multiple details, is a DataView, where you can adjust the layout, print or export the data (see DataView Menu). There may also be a header panel above for the "parent" of the details, or a DataView Footer below. By using the Field Chooser function you may be able to add more fields to the display from the Customization Screen.
Fields: (For help with data entry, see Field Select Boxes and Field Helpers.)
Access Type:
This field shows the type of item for which Access Rights are described. The Web Portal thus offers very "granular" security, because not only can you restrict users at various levels, but you can also itemize the information types available.
Inherited Access:
Protected. On this screen, Inherited Access comes from the more general settings for your entire Company, found in the Company Preferences, Customer Portal Tab.
You can set up an individual Customer with fuller Access Rights that override the Inherited Access from the Company Portal, as well as those that are more restricted.
For example, instead of selecting Inherited Rights, which might be "Read Only," for the entire Company, you could say "Full Access" - meaning for this Customer only. The broader Rights given to this Customer will override the more restrictive general Rights set for the Company.
Access Rights:
Click the down-arrow on the right side for the predefined Simple Lookup Box to select the degree of activity to be allowed for Access Types:
| • | No Access |
| • | Full Access |
| • | Read Only |
Page url: http://www.fieldone.com/startech/help/index.html?_web_portal_tab.htm