Navigation: Lists and Tables > Work Order Setup >
Problem Codes


|
Navigation: Lists and Tables > Work Order Setup > Problem Codes |
|
Problem Codes allow you to describe repeated types of problems that your Company does Service Calls for. When you Create a Service Call Work Order, you can optionally require a Problem Code on the initial entry screen, and later you can also use the Service Call Problems Tab to enter an unlimited number of Problem Codes.
Problem Codes can be helpful because each can bring up a list of sample questions to ask about the problem and/or lists of typical repairs, allowing Dispatch to verify that it really is a problem and to troubleshoot over the phone.
Using Check Lists and Repair Lists may help with the following:
| • | Providing a list of questions that you might want your dispatcher to confirm while taking the call. |
| • | Training new Dispatchers not familiar with typical Problem details |
| • | Allowing Technicians to be well prepared before arriving |
| • | Distinguishing between Maintenance Agreement work and more profitable calls |
Setting up a Problem Code:
| • | On the Work Menu at the top of the screen, click the Work Order down-arrow, and select Problem Codes. |
| • | The smaller-size Lookup screen will appear. (To add or change a record, see Small Lookup, Add or Edit.) |
| • | Next, the Problem Code Details screen will appear. This screen has a three Tabs, including Notes. |
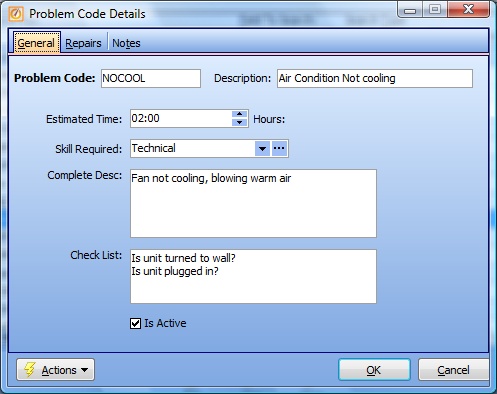
The Problem Code Details screen has three Tabs to maintain:
Problem Code:
Required. A short descriptive name for the Problem.
Description:
A longer description than the abbreviation in the Code name.
The typical number of Hours you predict needed for your Technicians to resolve this Problem. This entry provides a default time period when scheduling your Service Call.
Skill Required:
Specify an Employee Skill that might be required. (See Lookup Combo Box. To add an entry, click the Ellipsis button ( ) and select New.)
Complete Desc:
A free-form text field where you enter detailed description of the Problem. This will serve as the default Description on a Service Call with this Problem Code, where the user can override it with more specifics, if desired.
A free-form text field where you can enter multiple items to check or questions to ask.
TIP: Press ENTER to start a new line for each separate question or item to check.
Note: If the person taking a Service Call enters a Problem Code with a Check List defined, a protected Check List Tab on the right side displays questions and suggestions to help on the spot with identifying the problem more precisely.
On this Tab you can make multiple entries detailing the history of repairs for this type of Problem.
If the person taking a Service Call enters a Problem Code that has Repairs entered, a protected Repairs List Tab on the right side of the Problem Details Panel displays typical Repairs done for this type of Problem, providing more information to help on the spot with identifying the problem more precisely.
Labor Code:
The Labor Code shows the type of Labor used.
Repair Note:
Describes the Repair.
TIP: Press ENTER to start a new line for each separate Note to display as a list.
Technician Performed:
Tells which Technician did the repair.
Date Performed:
When the Repair was done.
Work Order #:
The Work Order for this specific Repair.
Is Active:
Use the check-box to indicate currently used by your Company. If you later remove the check-mark making this field Inactive, this entry will still show on older records where it has already been used, but will not be available for use in the future.
The default for the Lookup screen is to show Only Active records. You can remove the check-mark from the select-box on that screen and view all.
When complete:
Click OK to save your entries and exit the screen.
Page url: http://www.fieldone.com/startech/help/index.html?_tables_work_order_problem_codes_.htm