Navigation: Basic Working Procedures >
Counter Sales


|
Navigation: Basic Working Procedures > Counter Sales |
|
Counter Sales are also often called "walk-in" sales. This function is designed for invoicing the Customer who has come to the Company premises and intends to pay in person, allowing for Credit Card transactions.
You can also use the Counter Sales option as a quick, short-cut method of entering a Work Order and immediately creating an Invoice.
The name of this method indicates that you are "at a service counter," possibly using a dedicated computer terminal, dealing with a transient customer in the store or office. This person may be unknown or could be someone already in the Customer List. The sale may involve some Labor to be planned and done later.
The point is to let you process as much as you can, as quickly as you can. Using the Counter Sales screen, you can sell Parts and Labor immediately, complete the Invoice, and accept Payment, all during the time the customer is standing before you and waiting. This single screen lets you quickly access all the features and power of the normal Work Order screens. When completed, a Service Call appears in the Work Order Lookup screen, which you can schedule, maintain, and process as usual.
On the Lower Tasks Panel select the Action Manager and select New Counter Sale.
(Note that on Counter Sales screen itself the Save and New button allows you to have a computer terminal dedicated to this function, constantly open to the Counter Sale screen.)

The next screen to appear is determined by how you have set up the defaults for Counter Sales in the Company Preferences Work Order Tab.
| • | Customer for Counter Sales |
| • | Job Site for Counter Sales |
| 1. | If these two fields are empty in Company Preferences, the Select Customer and Job Site Screen screen will appear before continuing. |
| 2. | Otherwise the Company Preferences provide the default. (You can use Customer and Job Site maintenance to create "generic" Counter Sales entries for this purpose.) |
The Counter Sale screen will appear. See numbered sections below for explanation:
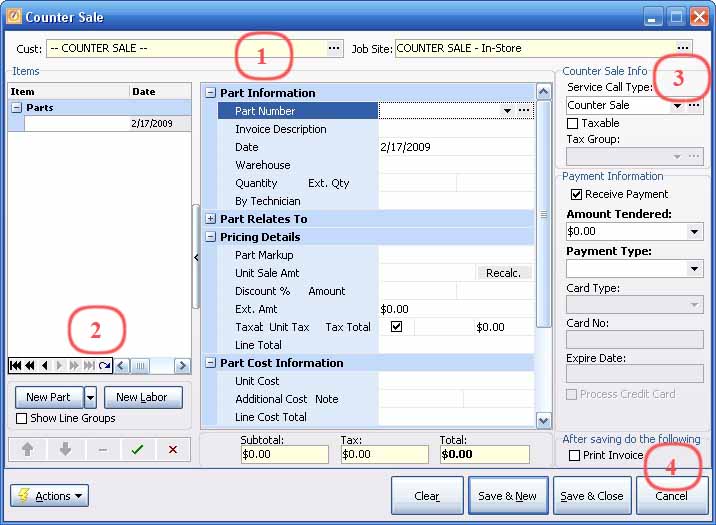
1. Customer and Job Site header:
Customer:
Notice that in this example, the Customer Header shows in yellow as protected, since it contains the Company Preference default for a "generic" Customer and Job Site. (Use Create New Customer and Create New Job Site to set up your own defaults and then select these in the Company Preference for Counter Sales.)
Even though the header is protected, you can change this by using the Ellipsis (...) to bring up the Select Customer and Job Site Screen screen and select from the actual Customer list.
Job Site:
You can only use the Ellipsis (...) here if the Customer is not the default for Counter Sales in the Company Preferences. In other words, for a real Customer selected from the Select Customer and Job Site Screen screen, you can still change the Job Site on this screen.
2. Items Tab entries for Parts and Labor:
Here you have all the typical Items Tab time-saving functions at your fingertips, such as the single Parts Search Popup Lookup Combo screen and the Multiple Parts Checkoff and Entry screen, as well as all the normal Labor screen entry helpers.
Please refer to the Work Order screen, Items Tab and its subtopics, as the model for using the different panels on all Items Tab entry screens.
3. Counter Sale Info:
Fields: (For help with data entry, see Field Select Boxes and Field Helpers.)
Service Call Type:
A selection from Work Order Types. (See Lookup Combo Box. To add an entry, click the Ellipsis button ( ) and select New.)
TIP: We strongly recommend that you set up at least one Work Order Type dedicated to Counter Sales, with the appropriate Parts and Labor Markups. You may wish to have more than one.
Taxable and Tax Group:
If the Counter Sale is taxable, click to add a check-mark in the box and then select the Tax Group. (See Lookup Combo Box. To add an entry, click the Ellipsis button ( ) and select New.)
Receive Payment:
The screen defaults to the check-mark in the box to indicate that you will Receive Payment. You can uncheck this box and then all the fields that relate to Payment are protected from entry.
Amount Tendered:
If the Amount Tendered is greater than the Total Amount at the bottom, then an extra field appears to help you make change. For Credit Card payments these two amounts must be the same.
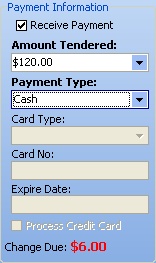
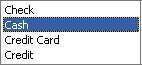
Payment Type:
Select from the Simple Lookup Box with predefined choices. Then the related fields appear:
Check Number:
This field accepts the Check Number if the Payment Type is by Check.
Card Type:
Payment Type - Credit Card: If the Customer has Credit Card information on file, the defaults appear from the Customer Payment Information Tab. Otherwise you fill in this information.
Card Number:
Payment Type - Credit Card: If the Customer has Credit Card information on file, the defaults appear from the Customer Payment Information Tab. Otherwise you fill in this information.
Expire Date:
Payment Type - Credit Card: If the Customer has Credit Card information on file, the defaults appear from the Customer Payment Information Tab. Otherwise you fill in this information.
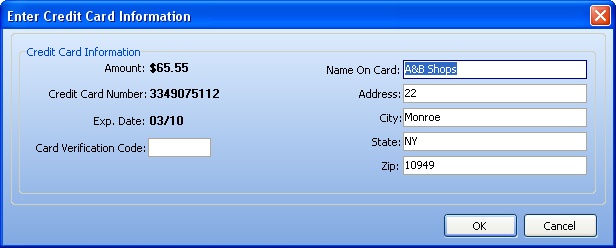
Process Credit Card:
Payment Type - Credit Card: If you place a check-mark in this box, the following screen appears when you click the button to Save the Counter Sale, allowing you to enter the Card Verification Code and/or the other information.
4. Finish and SAVE:
Print Invoice:
If you click to select Print Invoice with a check-mark, then as you exit the screen, the Print Confirmation screen appears.
There are four buttons at bottom for your action regarding entries you made on this screen:
| 1. | Clear - removes all entries made on the screen so far. You remain in this screen and can start over |
| 2. | Save and New - two actions: |
| • | Saves the Counter Sale just entered as a Service Call in the Work Order Lookup screen and its Invoice in the Invoice Lookup screen. |
| • | Opens the Counter Sales screen for the next Counter Sale entry. By using this you can keep one or more computer terminals dedicated and ready for "walk-in" sales at the counter. |
| 3. | Save and Close - two actions: |
| • | Saves the Counter Sale just entered as a Service Call in the Work Order Lookup screen and its Invoice in the Invoice Lookup screen. |
| • | Closes the Counter Sales screen and returns to wherever you were before in the program. |
| 4. | Cancel - exits Counter Sales screen without saving any information or performing any action |
Page url: http://www.fieldone.com/startech/help/index.html?_counter_sales_.htm