Navigation: Basic Working Procedures > Purchase Management > Purchase Order Requisition >
Display PO Requisition Screen


|
Navigation: Basic Working Procedures > Purchase Management > Purchase Order Requisition > Display PO Requisition Screen |
|
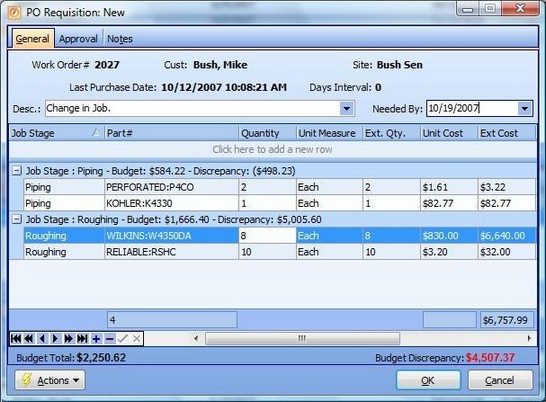
The PO Requisition Screen has three Tabs:
| • | General - (described below) allows you to enter multiple Parts request detail lines |
| • | Approval - displays multiple Approval (or Decline) responses received for this PO Requisition and allows you to Approve/Decline a PO Requisition |
| • | Notes - allows multiple Notes for this PO Requisition |
Here we display and discuss the fields on the General Tab screen:
This screen, with multiple details, is a DataView, where you can adjust the layout, print or export the data (see DataView Menu). There may also be a header panel above for the "parent" of the details, or a DataView Footer below.
Since the first row in the details says, "Click here to add new...." this is a Direct Data Entry screen, where you add or make changes to the lines themselves, using the Data Entry Icons and Paging Icons at the bottom.
Fields: (For help with data entry, see Field Select Boxes and Field Helpers.)
Header:
Last Purchase Date:
Protected. The last Date when a PO Requisition was created for this Work Order (or, Never)
Days Interval:
Protected. The number of days between the last PO Requisition and the current request to purchase.
Description:
A short descriptive name or phrase that will identify this PO Requisition in the detail display and elsewhere, perhaps the reason for it. (See Drop-down Text.)
Needed By:
Optional - The date the field manager would like to have the Parts requested here. (Click down-arrow for Calendar entry.)
Part Request Detail Lines:
Job Stage:
This field does not appear unless there are entries on the Job Stages Sub-Tab of the Work Order PO Requisition Tab. Make your selection from the predefined list. (See Simple Lookup Box.)
Part #:
The Part requested. (See Popup Lookup Combo Box, used for large Parts lists. To add an entry, click the Ellipsis button ( ) and select New.)
Note: If you have already entered Parts on the PO Requisition, Template Sub-Tab, then the entire list will appear now and you only need to select the ones you want and enter the Quantity.
Quantity #:
Required for a PO Requisition to be created. This value will influence Budget Totals.
Unit of Measure:
Default from the General Tab for this Part. You can change the Unit of Measure, and this will affect the Extended Quantity below. (See Lookup Combo Box. To add an entry, click the Ellipsis button ( ) and select New.)
For example, if the U/M of the Part is "Each" and you change this to "Case of 12," the Quantity you enter will be multiplied times 12 for the Extended Quantity
Extended Quantity:
Protected - calculated result of Quantity times Unit of Measure Quantity. This value will influence Budget Totals.
Unit Cost:
Defaults to the Inventory Cost on the General Tab for this Part. This value will influence Budget Totals.
Extended Cost:
Protected - calculated result of Quantity times Unit Cost entered above. This value will influence Budget Totals.
Budget Totals:
The Parts List that you set up on the PO Requisition Template creates Budget Totals (or expected amounts) for each Job Stage and the entire List. See Budget Totals there for a full explanation of how the Quantity and Cost fields on the Template control Budgets.
Budget Total:
This field shows you the overall Budget specified using the PO Requisition Template (if any).
Budget Discrepancy:
This field shows you the discrepancy between the proposed Budget, if any, including all Job Stages, and the Actual Cost of the Parts on this request.
Note: If you have not created a Template, then no Budget exists, so the Budget Discrepancy Total at the bottom of this screen will always be positive indicating that you have "exceeded" the non-existent budget.
When completed:
To save this PO Requisition and all of the Requested Parts, click the OK button.
As you exit the screen and save the PO Requisition, an email notice is sent to any Employees specified on the Requisition Notification Sub-Tab, including those whose Approval is needed. (For email notice, make sure to set up your SMTP protocol, using the Company Preferences, Email Settings Tab.)
Page url: http://www.fieldone.com/startech/help/index.html?_display_po_requisition_screen_.htm