Navigation: Basic Working Procedures > Work Orders > Process a Service Call >
Describe Service Call Problems


|
Navigation: Basic Working Procedures > Work Orders > Process a Service Call > Describe Service Call Problems |
  
|
Usually you need to Describe Service Call Problems. When you begin to set up a Service Call, you have the opportunity to enter a single Problem Code in the Problem Details panel of the screen.
If the Work Order Type of the Service Call does not require a Problem Code, or if you wish to add more details about problems later, you can use the Problems Tab of the Service Call Work Order to enter as many Problem Codes and as much description as you desire.
On the Tasks Panel at the left of the work screen, use the Lookup Manager to select Work Order Lookup. (To add or change a record, see Large Lookup, Add or Edit.)
When the Work Order Details screen appears, click on the Problems Tab.

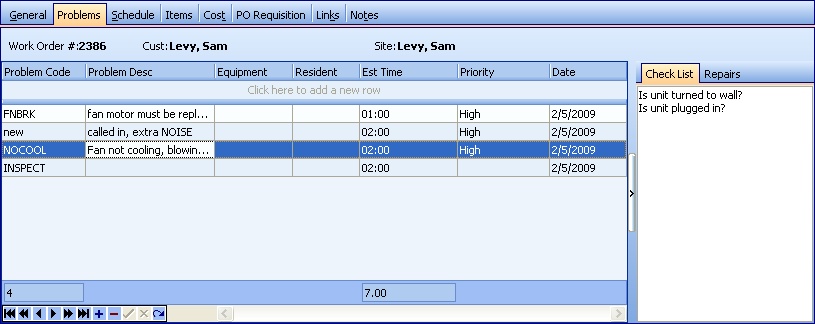
This screen contains two panels:
| • | On the left - the Details Entry panel allows you to enter multiple Problems. |
| • | On the right - the Check List / Repairs panel, used for reminders triggered by the Problem Code on display. |
This screen, with multiple details, is a DataView, where you can adjust the layout, print or export the data (see DataView Menu). There may also be a header panel above for the "parent" of the details, or a DataView Footer below.
Since the first row in the details says, "Click here to add new...." this is a Direct Data Entry screen, where you add or make changes to the lines themselves, using the Data Entry Icons and Paging Icons at the bottom.
Fields: (For help with data entry, see Field Select Boxes and Field Helpers.)
Problem Code:
Required. One of the Problem Codes helpful in describing the work for this Service Call. (See Lookup Combo Box. To add an entry, click the Ellipsis button (…) and select New.)
Problem Description:
Default from the Problem Code. You can change this. (See Drop-Down Text Box.)
Equipment:
Identifies the piece of Equipment (if any) for this Customer Job Site related to the Problem. (See Lookup Combo Box. To add an entry, click the Ellipsis button (…) and select New.)
Resident:
Identifies the Resident Unit (if any) for this Customer Job Site related to the Problem. (See Lookup Combo Box. To add an entry, click the Ellipsis button (…) and select New.)
Priority:
Optional. If desired, select a predefined Schedule Priority. (See Lookup Combo Box. To add an entry, click the Ellipsis button (…) and select New.)
Date:
Default is Today. You can change this. (See Calendar Helper.)
Click the left-right arrow icons to toggle back and forth between tabs displaying Check Lists and Repairs. (Note the resizing arrow halfway down, which you can drag to enlarge either panel.):
| • | If you enter a Problem Code with a Check List defined, a protected Check List Tab on the right side displays questions and suggestions to help on the spot with identifying the problem more precisely. |
| • | If you enter a Problem Code that has Repairs entered, a protected Repairs List Tab on the right side displays typical Repairs done for this type of Problem, providing more information to help on the spot with identifying the problem more precisely. |
| • | A Problem Code could have both a Check List and also Repairs details. |
Page url: http://www.fieldone.com/startech/help/index.html?_service_call_problems_tab_.htm