Navigation: Basic Working Procedures > Customer Invoices >
Invoice a Fixed-Amount Project


|
Navigation: Basic Working Procedures > Customer Invoices > Invoice a Fixed-Amount Project |
|
An Invoice for a Fixed-Amount Project differs from the one for a Service Call. One difference between a Service Call and a Project is the point at which the final amount for billing is determined. For a Project billing is set during the Estimate, when the Customer signs acceptance of pricing.
With a Service Call the amount to be billed changes as work proceeds and charges add up. With a Project there are only two ways to change the total amount that will be billed.
| 1. | If no billing has occurred, you can Deactivate a Project and go back and create Revisions, thus producing a new Estimate with a new total amount. |
| 2. | Once a Project is Activated you can add Change Orders. These only affect the billed total if the Change Order itself is Activated, in other words, entered into the Project. If the Change Order is only created but not Activated, then the Project Billing remains unchanged. |
Another difference from billing a Service Call is that a Project may be partially billed as it goes along, according to a Payment Plan, instead of waiting until the end.
Billing for a Project depends on whether or not there is a Payment Plan:
| • | A defined Payment Plan will appear on the Invoice, with its Invoice Amount. |
| • | With no Payment Plan, the Invoice displays the Items determined by the Estimate Items Sub-Tab of the Work Order, with their billing amounts. |
| ► | Some or all Estimate Items may show Parts and Labor directly |
| ► | Some or all Estimate Items may be gathered together in Line Groups with a description appropriate for the Customer. (To change these, you need to maintain the Estimate Items Sub-Tab of the Work Order.) |
How to Invoice a Fixed-Amount Project:
| • | Open the desired Work Order in any way you choose |
| ► | Click the Actions button |
| ► | Select Create Invoice |
| • | Or, use the Billing Manager Tab of the Office Manager where you can see all the Work Orders that already have some Parts and/or Labor applied: |
| ► | Select the Work Order that you would like to bill |
| ► | Click the Create Invoice button |
The Create Project Invoice screen:
On the work screen there are two Tabs. For both versions of the first Tab, in general the screen fields and treatment are pretty much the same.
| 1. | Payment or Items Tab - the actual billing lines for the Invoice |
| 2. | Details Tab - replacement Billing Text for the Invoice |
On the first Tab, the Line Items on the screen will show details from either the Payment Plans Sub-Tab or the Estimate Items Sub-Tab of the Work Order.
When the Project has a Payment Plan (the Payment Plans Tab):
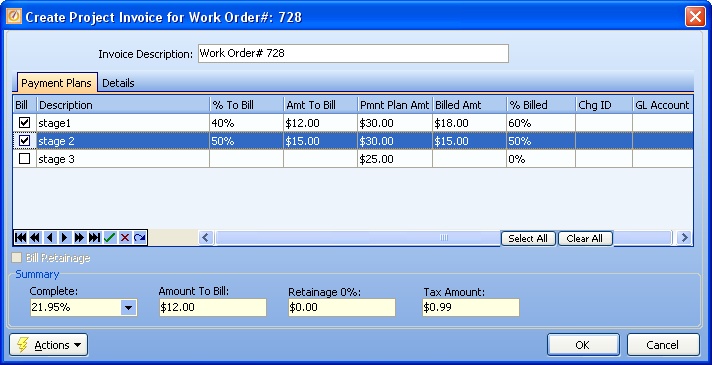
This screen, with multiple details, is a DataView, where you can adjust the layout, print or export the data (see DataView Menu). There may also be a header panel above for the "parent" of the details, or a DataView Footer below. By using the Field Chooser function you may be able to add more fields to the display from the Customization Screen.
When the Project does not have a Payment Plan (the Items Tab):
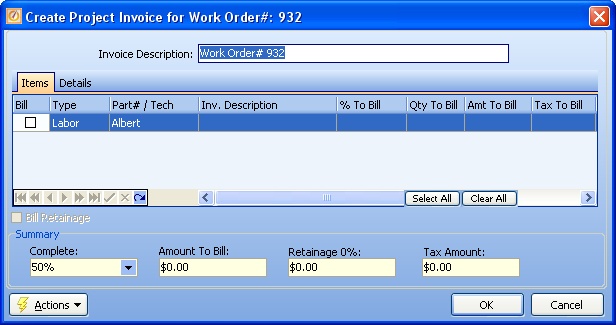
This screen, with multiple details, is a DataView, where you can adjust the layout, print or export the data (see DataView Menu). There may also be a header panel above for the "parent" of the details, or a DataView Footer below. By using the Field Chooser function you may be able to add more fields to the display from the Customization Screen.
Fields: (For help with data entry, see Field Select Boxes and Field Helpers.)
Bill Retainage:
Use the check-box below the DataView to Bill Retainage, if any.
Bill:
Use the check-boxes to select one or more of the Line Items for this Invoice .
Invoice Description:
Defaults from where the Line Item was defined (the Payment Plans Sub-Tab or the Estimate Items Sub-Tab of the Work Order). You can also make changes right here in what prints for the Customer.
% To Bill:
Enter the percent of the Line Item you would like to bill. An entry here controls Amt To Bill
Amt To Bill:
Enter the exact amount of the Line Item you would like to bill. An entry here controls % To Bill
Tax To Bill:
Protected - Tax Amount to charge for this Line Item. Defaults from the Work Order Taxable settings.
Line Sale Amount:
Protected - the total amount for this line, including Tax. Even if this amount is $0.00, if the line is selected it will print on the Invoice.
Billed Amount:
Protected - the amount this line has already been billed on previous Invoices
% Billed:
Protected - the percent that has already been billed on previous invoices
Change ID:
Protected - shows if this line item pertains to a Change Order.
GL Account:
This line will show the GL Account that will be used for this line when exporting to QuickBooks. You can change this value.
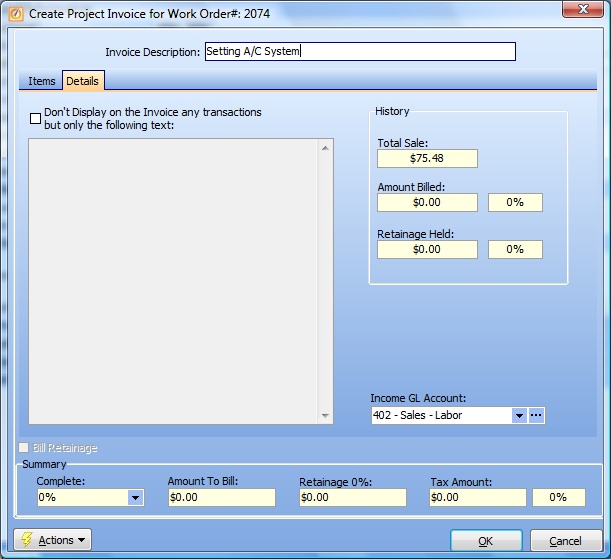
Most of the fields below are protected, for display only and provide a review of the planned Invoice.
Don't display on Invoice any transactions:
Click the check-box if you do not wish to display an itemized Invoice. Whatever memo you then key into this text box will show on the Invoice, along with the total amount selected on the Items Tab. The amount and the memo will form the only Line Item on the Invoice.
Bill Retainage:
If this invoice you are about to create will bill 100% of the job, and if there is Retainage defined on the job, then this check-box will allow you to select whether to include the Retainage that was withheld during the job on this Invoice.
Summary:
Protected - This area shows the summary of the Invoice to be created.
Complete:
Protected - This field will show the % of the job completed, depending on the items you have checked to bill.
Amount To Bill:
Protected - This will show the total amount of the Invoice to be created.
Retainage:
Protected - This will show you the Retainage amount that will be withheld as part of this Invoice.
Tax Amount:
Protected - This will show the total tax on the amount of the Invoice to be created.
When completed:
Click OK to save and print the Invoice.
Next you will see the Print Confirmation Screen.
For a Service Call, once an Invoice is created the Status will be set to Billed.
For a Project, the Status is set to Billed only when all billing has been completed. Any partial billing will be reflected on the Work Order:
| • | on the Work Order Header in the Accounts Receivable Work Order Overview |
| • | as Amount Billed on the Payment Plans Sub-Tab. |
To add more transactions to a Billed Work Order you need to Reactivate the Work Order. As explained in the Reactivate topic, certain transactions will also automatically Reactivate a Work Order, after showing you a confirmation message.