Navigation: Lists and Tables > Accounting Setup >
Tax Groups


|
Navigation: Lists and Tables > Accounting Setup > Tax Groups |
|
Tax Groups allow you to use a single Tax Code or a combination of several Tax Codes (with differing characteristics) when billing a Customer.
You do not directly apply a Tax Code to a Work Order. For the Work Order you select the relevant Tax Group, which may contain either a single Tax Code or a combination of several, such as State and County taxes. You will appreciate the increased flexibility and precision provided.
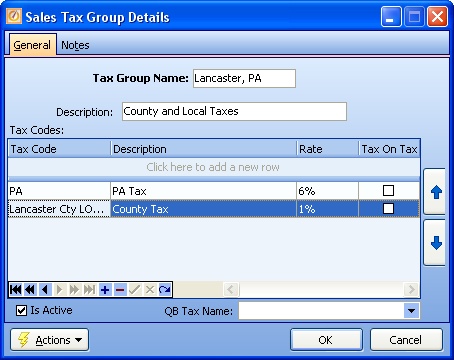
For example, you might have a Tax Group called "Lancaster, PA."
| • | That Tax Group might contain two Tax Codes, one for overall Pennsylvania State Tax and one for Lancaster County Local Tax, which will be summed up to charge the Customer. |
| • | Perhaps for one of these Tax Codes there is a Tax on Labor Sales, while for the other there is none. |
| • | All these details for taxing a job in Lancaster, PA. are expressed by using the single Tax Group on the Work Order. |
Note that when you wish to change an existing Tax Rate, the place to do this is on the Tax Code that contains the rate. The Tax Rate only displays in the Tax Group as a protected field, where you can use the Ellipsis ( ) to open the Tax Code and make the Rate change in the Tax Code record.
To set up your Tax Group entries, first define your Tax Codes and then create the Tax Groups that contain and combine those Tax Codes.
| • | On the Work Menu at the top of the screen, click the Accounting down-arrow, and select Tax Groups. |
| • | The smaller-size Lookup screen will appear. (To add or change a record, see Small Lookup, Add or Edit.) |
| • | Next, the Sales Tax Group Details screen will appear. This screen has a second Tab for Notes. |
This screen, with multiple details, is a DataView, where you can adjust the layout, print or export the data (see DataView Menu). There may also be a header panel above for the "parent" of the details, or a DataView Footer below.
Since the first row in the details says, "Click here to add new...." this is a Direct Data Entry screen, where you add or make changes to the lines themselves, using the Data Entry Icons and Paging Icons at the bottom.
Screen header fields:
Required. The abbreviated, descriptive name for this Tax Group.
Description:
Fuller description, perhaps indicating combined Tax Codes.
Tax Code Detail Lines:
Tax Code Name:
Name of Tax Code. (See Lookup Combo Box. To add an entry, click the Ellipsis button ( ) and select New.)
Description:
Protected. Defaults from the selected Tax Code.
Rate:
Protected. Defaults from the selected Tax Code.
Tax on Tax:
There are certain government agencies that charge tax above the local tax (e.g. Canadian government). In these cases you check the Tax On Tax field and make sure the Tax On Tax Codes are below the Tax Code that they "piggy-back." (You can change the sort order using the Up-Down Arrows at the right side of the screen.)
Screen footer fields:
Name of the Sales Tax Item created in QuickBooks for FieldOne during the Initial QuickBooks Import process. Note the format of this name, PST - Tax (<Tax Group Name>).
If an Invoice is taxable, the Export to QuickBooks will search in QuickBooks for the Sales Tax Item named exactly as in QB Tax Name. If this field is empty, then QuickBooks will use the Tax Group with the name "PST - Tax (Unknown).." (For more details refer to Link Records Created in QuickBooks.)
Is Active:
Use the checkbox to indicate currently used by your Company. If you later remove the check-mark making this field Inactive, this entry will still show on older records where it has already been used, but will not be available for use in the future.
The default for the Lookup screen is to show Only Active records. You can remove the check-mark from the select-box on that screen and view all.
When complete:
Click OK to save your entries and exit the screen.
Page url: http://www.fieldone.com/startech/help/index.html?_tables_accounting_tax_groups_.htm