Navigation: Lists and Tables > Employee Setup >
User Groups


|
Navigation: Lists and Tables > Employee Setup > User Groups |
|
When granting Security Authorization, User Groups save time and also tighten security. You use these to classify groups of Employees with certain levels of Security Rights.
An Employee assigned to a User Group (on the Employee Security Tab) "inherits" all the attributes and rights of that User Group. Rather than define many Security Rights individually for this Employee, all you have to do is enter any overrides that apply or select a different User Group.
Thinking in terms of User Groups clarifies the degree of security needed for different types of Employee. Also, if you decide to change the Security Rights for a given User Group, all Employees in that User Group immediately "inherit" those changes.
The one exception to User Group Security is the User ID with the Admin password used to set up your Company. Anyone signing on with this User ID, no matter what User Group the Admin Employee profile contains, has all Security Rights throughout the application. This is an important reason why the Admin User ID should have a strong password and very limited sharing (if any).
Setting up a User Group:
| • | On the Work Menu at the top of the screen, click the Employee down-arrow, and select User Groups. |
| • | The smaller-size Lookup screen will appear. (To add or change a record, see Small Lookup, Add or Edit.) |
| • | Next, the User Group Details screen will appear. This screen has a second Tab for Notes. |
Note that the maintenance screen for User Groups contains two Tabs at the very top:
| • | General Tab |
| • | Notes Tab |
And lower down the General Tab is divided into two Sub-Tabs:
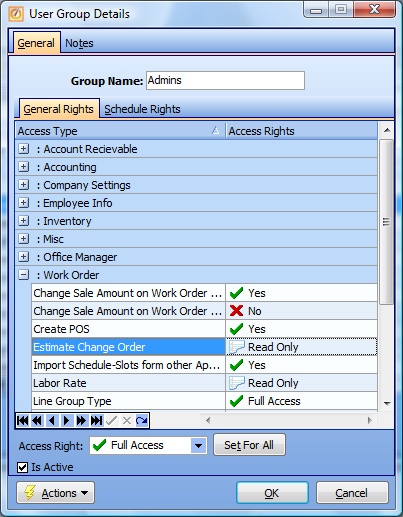
| • | General Rights Sub-Tab - shown in the image above |
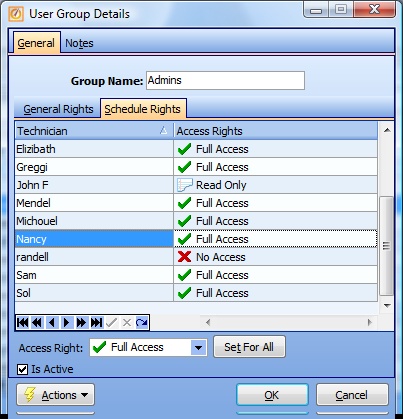
| • | Schedule Rights Sub-Tab - shown in the image below |
Screen fields:
Group Name:
Required. A short, descriptive name for the User Group (e.g." Admins," "Techs," etc.)
Is Active:
Use the checkbox to indicate currently used by your Company. If you later remove the check-mark making this field Inactive, this entry will still show on older records where it has already been used, but will not be available for use in the future.
The default for the Lookup screen is to show Only Active records. You can remove the check-mark from the select-box on that screen and view all.
| • | This Tab contains a DataView list that displays all functions in FieldOne, grouped by application module, such as Accounts Receivable, Accounting, Company Settings, Employee Info, and so on. |
| • | Click on the Open-Shut Icon (+) to open the module for specific functions. |
| • | On the right side of the window use the predefined Simple Lookup Box to select the level of Access to the function for this User Group: |
| ► | Full Access |
| ► | Read Only |
| ► | No Access |
| • | The Employee Security Tab uses Inherited rights, so if a change is made to the "parent" User Group Access Rights, this change will immediately be reflected in the Access Rights for all Employees in this User Group. |
| • | On this Tab you specify whether the listed Employees are allowed to view and/or modify Schedules for other Employees within the Company. |
| • | In order to be able to access your own Schedule, you must have security rights granted on the General Rights Tab under the Work Order group for Schedule Board, Self-Schedules. |
| • | Everything said on the General Rights Tab above also applies here. |
When complete:
Click OK to save your entries and exit the screen.
Page url: http://www.fieldone.com/startech/help/index.html?_tables_employee_user_groups_.htm