Navigation: Basic Working Procedures > Tasks and Alerts >
Set up Tasks and Alerts


|
Navigation: Basic Working Procedures > Tasks and Alerts > Set up Tasks and Alerts |
|
Use the Tasks Sub-Tab to Set up Tasks and Alerts for both yourself and other Employees:
Here is a sample Tasks Sub-Tab screen:
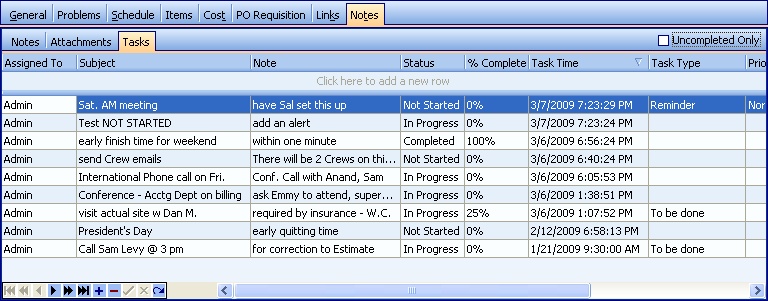
This screen, with multiple details, is a DataView, where you can adjust the layout, print or export the data (see DataView Menu). There may also be a header panel above for the "parent" of the details, or a DataView Footer below.
Since the first row in the details says, "Click here to add new...." this is a Direct Data Entry screen, where you add or make changes to the lines themselves, using the Data Entry Icons and Paging Icons at the bottom.
TIP: The Uncompleted Only check-box in the upper right defaults to a check-mark, causing all 100% Completed and Inactive Tasks to drop off the view. Removing the check-mark will cause all Tasks to show.
Fields: (For help with data entry, see Field Select Boxes and Field Helpers.)
TIP: Since this screen has more fields than this image contains, be sure to scroll to the right in order to view and maintain all of them.
Defaults to the Logon User ID. Yourself or some other Employee, who can track this Task in the My Tasks Tab of the Office Manager, as well as Receive Alerts for this Task.
Subject:
Title or quick identification. (Use Spell Check Helper.)
Drop-down Text entry allows you to put in a long note in free-form text. (Use Spell Check Helper.)
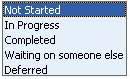
Status:
Defaults to Not Started. Predefined choices from Simple Lookup Box: The Employee receiving an Alert can change the Status to inform the person who assigned it.
Optional. Updating this field relates to the Uncompleted Only check-box above the DataView.
| • | Either you or the assigned Employee can maintain this field. (Use Calculator Pad Helper.) |
| • | When Tasks are 100% Complete, and the Uncompleted Only check-box is checked (default value), then these Tasks no longer appear on the screen. |
| • | When the Uncompleted Only check-box is empty, then all Tasks appear, including completed ones. |
The Time that this Task becomes active as an Alert.
| • | You can leave this field empty, and the Task just sits waiting. This Task does not become an Alert. However, you can return later to put in the Task Time to start an Alert. |
| • | If you enter the Task Time as "Now" or in the past, it immediately enters the automatic Alert monitoring. |
| • | If you put the Time in the future, that is when the Alerts will start arriving. (Use Calendar and Clock Helper.) |
Task Type:
You can set up a variety of Task Types, which can help with DataView functions in managing long lists of tasks, as in the My Tasks Tab of the Office Manager. (See Lookup Combo Box. To add an entry, click the Ellipsis button ( ) and select New.)
Priority:
Optional. Select a predefined Priority from the Simple Lookup Box.
![]()
Group:
Optional. You can determine Groups here as you see fit, which can help with DataView functions in managing long lists of tasks, as in the My Tasks Tab of the Office Manager. There is no List Table entry for this type of Group. Tasks Sub-Tabs for different types of entries might have entirely different Groups. Enter a new Group directly or select one from the Progressive Lookup Box.

Updating this field relates to the Uncompleted Only check-box above the DataView. This flag defaults to an Active check-mark when you create a new Task.
| • | When the Uncompleted Only checkbox is checked, only Tasks checked as Active will appear. |
| • | When the Uncompleted Only checkbox is empty, both Active and Inactive Tasks will appear. |
| • | The Active flag is set to Inactive (empty) when an Employee selects Dismiss Alert. (See Take Charge of Alerts.) |
| • | Note that this Task may then no longer appear, depending on the Uncompleted Only box above. |
| • | To reactivate an Alert that has been Dismissed: |
| 1. | Set the Uncompleted Only box to empty so that Inactive Tasks will show |
| 2. | When the Task detail appears, set the Active Flag back on |
Task Owner:
Protected. Automatically filled with the Logon User ID, who can track this Task in the My Tasks Tab of the Office Manager.
Protected. Automatically filled with the Task Time above, when you create or manually maintain the Task detail record.
| • | From then on, this field is time-stamped every time an Alert pop-up appears for an Employee. |
| • | If you Snooze an Alert, the Remind Time shows when the next Alert pop-up will occur. |
| • | When you review Tasks, you can observe when the Employee last received an Alert or next will receive one. |
Page url: http://www.fieldone.com/startech/help/index.html?_tasks_and_alerts_set_up_.htm