Navigation: Lists and Tables > A/R (Accounts Receivable) Setup >
Campaigns


|
Navigation: Lists and Tables > A/R (Accounts Receivable) Setup > Campaigns |
|
You can establish many Campaigns and group these into Campaign Types. You enter the Campaign on the Customer Detail Tab. The Customer value then defaults to the Work Order, where you can identify the Work Order as belonging to a different Campaign, if needed. You can track Profits related to Campaigns by Customers, by Campaign, and in a number of different ways. These results will help you to analyze your marketing expenses for various sources.
Since the Campaign is ultimately attached to and billed by the Work Order, the tracking reports are found in the Work Order section of Dynamic Reports, currently in the System Report titled Profit and Loss by Work Order. As with any Dynamic Report, the Campaign column here can be used to sort, group, select and sum. (See Work Order Dynamic Reports, Profit and Loss by Work Order - 2, for an example of a report customized to track Campaigns.)
Setting up a Campaign:
| • | On the Work Menu at the top of the screen, click the A/R down-arrow, and select Campaigns. |
| • | The smaller-size Lookup screen will appear. (To add or change a record, see Small Lookup, Add or Edit.) |
| • | Next, the Campaign Details screen will appear. This screen has a second Tab for Notes. |
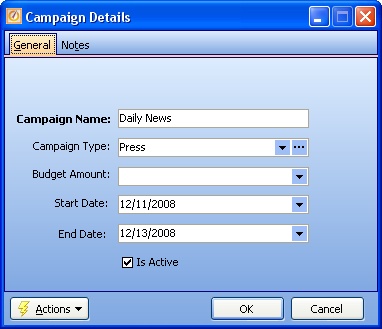
Screen fields:
Campaign Name:
Required. The descriptive name for this Campaign, according to those chosen by your Company.
Campaign Type:
The Campaign Type group that this particular Campaign belongs to. (See Lookup Combo Box. To add an entry, click the Ellipsis button ( ) and select New.)
Budget Amount:
A money amount representing what you plan to spend for this Campaign.
Start and End Date:
Optional - to indicate the Date Range for this Campaign. Click down-arrow for Calendar Helper.
Is Active:
Use the checkbox to indicate currently used by your Company. If you later remove the check-mark making this field Inactive, this entry will still show on older records where it has already been used, but will not be available for use in the future.
The default for the Lookup screen is to show Only Active records. You can remove the check-mark from the select-box on that screen and view all.
When complete:
Click OK to save your entries and exit the screen.
Page url: http://www.fieldone.com/startech/help/index.html?_tables_accounts_receivable_campaigns_.htm