Navigation: The User Interface > DataView Reports >
New Custom Reports


|
Navigation: The User Interface > DataView Reports > New Custom Reports |
|
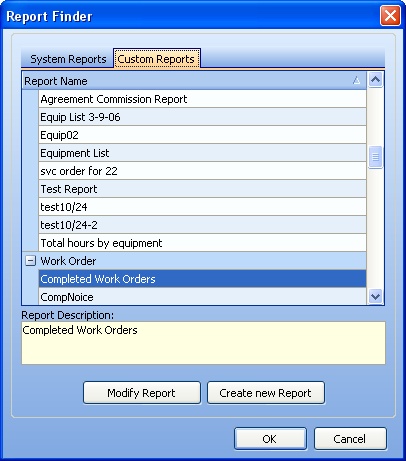
To create New Custom Reports use the Create New Report button on the Report Finder screen.
When you click the Create New Report button, the Create Report Wizard opens at the Start screen:
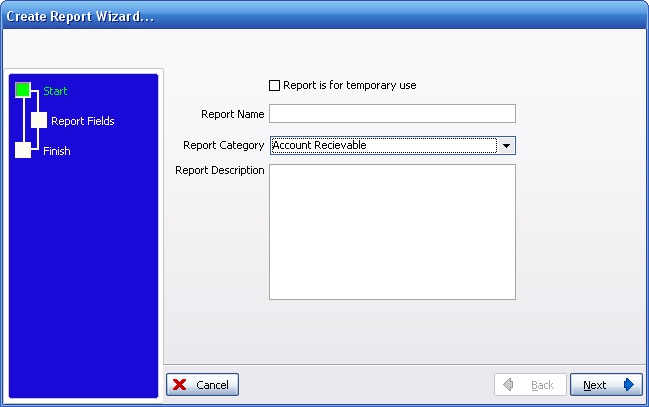
Fields: (For help with data entry, see Field Select Boxes and Field Helpers.)
Report Name:
A unique and meaningful name that sums up the contents of the report.
Report Category:
Select one of the existing Dynamic Report categories. (See Simple Lookup Box.)

Report Description:
Free-form text box where you can enter a description that will help a user to understand the purpose of this report.
Click the Next button at the bottom right to continue to the Report Fields screen:
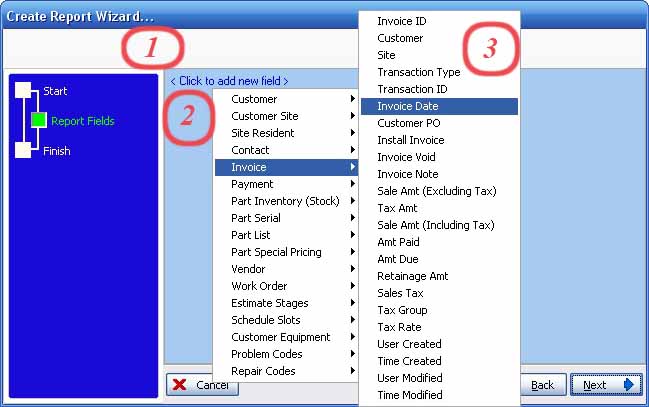
| 1. | <Click to add new field> - when you first click, the default appears, which is the is first File and first Field in that file (for instance, "Customer.Customer ID." Click again on the default File and Field and the menu list of all available File Names will appear. |
| 2. | Select a File Name from the list of files available for reports. When you hover the mouse over a File Name, another menu list of all Field Names in that File appears. |
| 3. | Select a Field Name from the list of fields in the selected File |
| 4. | <Click to add new field> - Repeat selecting Files and Fields until you have all the Field Columns you desire |
| 5. | Then click the Next button at the bottom right to continue |
Change, Move, or Add and Delete selected fields:
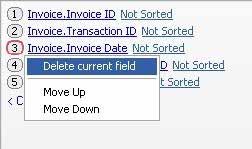
| 1. | Click the number identifying the field - the drop-down box appears for you to select the action for that column. You can delete the field or move it up or down, that is to say, moving the column closer to the left side of the report, or farther over to the right. |
| 2. | <Click to add new field> - (Proceed as described above in Field Selection.) |
| 3. | Click on any existing File and Field and the drop-down boxes for File and Field selection will appear, for you to change the field in that column. (Proceed as described above in Field Selection.) |
The Finish screen will appear:
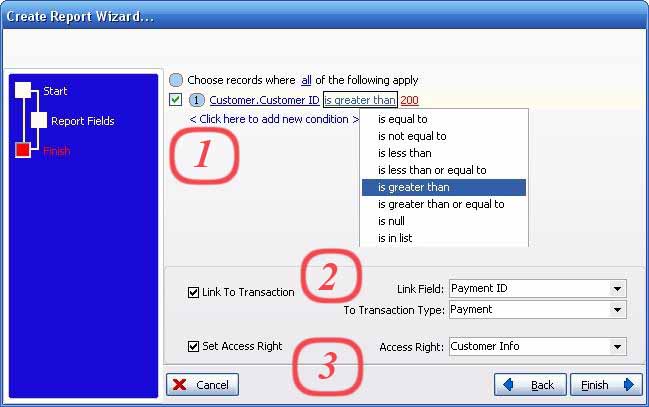
The Finish screen allows you to perform three functions:
| 1. | Add Filtering Logic for Field columns |
| ► | Click on the File Name.Field Name area as in the preceding screen to select a Field |
| ► | Click on the Conditions area for a drop-down box where you can select conditional logic |
| 2. | Link a Field to a Transaction detail record |
| 3. | Set Access Rights linking the report to an Access Type for the Report Category, so that Employees can use this report who have that Access granted on their Security Tab. |
When you have completed any selections here, click the Finish button at the bottom right.
Page url: http://www.fieldone.com/startech/help/index.html?_dataview_rpts_new_custom_reports_.htm