Navigation: Basic Working Procedures >
Contact List


|
Navigation: Basic Working Procedures > Contact List |
|
Contacts are persons or businesses whom Employees in your Company may need to reach and store information about. (This group is not to be confused with Alternate Contacts attached to Customers, Job Sites, Employees, etc., as alternative ways of reaching any of these if the need should arise.)
Contacts are not actual Customers, Vendors, Employees, etc. Perhaps they are in the process of becoming one of these, and you are only keeping track of them for now. Basically these are simply names that you would like to store and have accessible to any Employee with security authorization to this list. You can use Contact Types to group these in a way meaningful to your Company.
A special instance of a Contact is a business Prospect whom you hope to have as a Customer. You can create one or more Contact Types relating to Prospects. Also you can convert a Contact into a Customer as one of the Actions on the Details screen.
To Set up a Contact:
| • | Use the Tasks Panel at the left of the work screen |
| ► | Select the Action Manager |
| ► | Select New Contact |
| • | To work with an existing Contact |
| ► | Select the Lookup Manager |
| ► | Select Contact Lookup. |
| • | Using the Lookup screen, add or select a record. (To add or change a record, see Large Lookup, Add or Edit.) |
The Contact Details screen will appear:
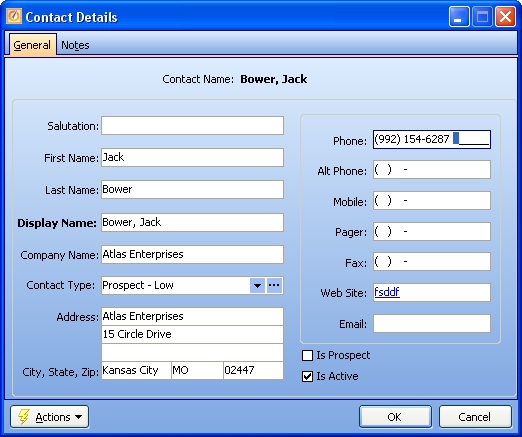
A Full-Page screen like this one collects information about a single item. It may have one or several panels of information, perhaps using Hide-Show Icons to control whether you see or hide a panel, and Plus and Minus Sign Icons to expand or condense groups of related fields.
To convert a Contact to a Customer, click on the Actions button at the bottom left and then select Convert To Customer. You will receive a message reminding you to Inactivate this entry as a Contact, now that it has become a Customer:

Fields: (For help with data entry, see Field Select Boxes and Field Helpers.)
Display Name:
Required. Enter a unique, descriptive name to for Lookup and print functions.
The remaining name and address fields are optional. Fill in as you please. If and when you Convert to a Customer, then this information will be carried over.
Company Name:
This information is also carried over, if you Convert to a Customer.
Contact Type:
Use a Contact Type to help describe why you added this entry and to use on Lookup screens, etc.
Address:
This information is also carried over, if you Convert to a Customer.
Tip: In order to make use of Mapping, always record the street address on the second line of the address field. Extra information such as the apartment / suite number can go on the third line of the address field.
Contact:
Phone, Alt. Phone, Fax, Web Site, Email:
Enter as many of the above as you need.
Is Prospect:
Check-box to indicate those Contacts who may become Customers in the future. Helps on the Lookup screen when reviewing different types of Contacts.
Is Active:
Use the checkbox to indicate currently used by your Company.
The default for the Lookup screen is to show Only Active records. You can remove the check-mark from the select-box on that screen and view all.
Page url: http://www.fieldone.com/startech/help/index.html?_contact_list_.htm